A collection of everything I have learned over years of tanking Twins.
Contents
- 0. Preface
- 1. The Basics
- 2. Step-By-Step Tanking a Phase
- 3. Movement and Positioning
- 4. Consumable List
- 5. Gearing
- 5.1 Stat Priority
- 5.2 Example SR Sets
- 5.3 Item Alternatives/Options
- 5.3.1 Head
- 5.3.2 Neck
- 5.3.3 Shoulders
- 5.3.4 Back
- 5.3.5 Chest
- 5.3.6 Wrist
- 5.3.7 Hands
- 5.3.8 Waist
- 5.3.9 Legs
- 5.3.10 Feet
- 5.3.11 Rings
- 5.3.12 Trinkets
- 5.3.13 Weapon
- 5.3.14 Wand
- 5.4 Runed Stygian Patterns
- 6. Talents
- 7. Melee Mode
- 8. Spell Pushback Analysis
- 9. Useful Resources
0. Preface
0.1 The Goal of This Guide
The novelty of a Warlock tank has made Twin Emps highly discussed. However, in my experience, it is by far the most consistent and easy role in the fight. That said, it is incredibly fun!
The primary goal of this guide is to coach anyone to be capable of performing the role in Hardcore, even if they have zero prior experience with AQ40 in any capacity. It provides a step-by-step explanation of how to perform the fight, as well as everything you need to know to prepare ahead of time.
The nature of Hardcore demands consistent strategies that work on the first try. For that reason, the same strategies can be applied by non-Hardcore (softcore) guilds who are progressing the raid. It is not the task of this guide to discuss parse strategies, instead aiming for an extremely simple, repeatable, methodology with as little movement and intricacy as possible.
Additionally, there are several non-trivial questions on which I hope to share my knowledge. In particular the matters of spell pushback mitigation, and Vek'lor's Melee Mode. The latter of which is still not fully understood.
This is a very long document. Don't let that dissuade you from tanking Twins! Done right Warlock tanking on this fight should be very easy. I recommend you focus on the Step-By-Step Tanking a Phase and Movement and Positioning sections, then use the rest for further reading or as a reference to answer any questions you may have. I've included links to each section, and sub-section, in the Contents, as well as a floating arrow in the bottom right that will take you back to the top.
0.2 About the Author
Who is esuvii? In short, I love HC WoW and my favourite class is Warlock! I played Warlock through 2019 Classic, TBC and WotLK. In mid-late 2020, I first tried Hardcore, largely inspired by watching B0aty play HCIM OSRS I attempted (and succeeded) to level a HC Hunter to 60. Later I began to actively play as a member of the Classic Hardcore community, and in November 2021 I joined the HC Road to Ragnaros event in Season of Mastery. Ever since then I've been raiding as a Warlock in HC Elite.
As of writing this, I've played Warlock on Twins Emps a minimum of:
- 32 times in softcore.
- 12 times in unofficial HC on BSB (including the first ever clear).
- 73 times in official HC on Defias Pillager (including the world first official clear).
During this time I have coached several Warlocks to tank Twins in HC, including those with zero experience.
We have NEVER had a Warlock tank die on Twins.
Through HC I have tanked in a BWL level SR set, absolute BiS SR gear, fresh 60 + crafted SR gear, and one time when I forgot to equip SR gear.
While there is no single highest authority on this fight, I believe there is a strong case that I have the most HC experience.
0.3 Questions and Feedback
If you have any questions, or any feedback, please do not hesitate to reach out to me. You can find me as esuvii on Discord, or stop by my Twitch stream and I will do my best to help. If there's anything I have missed, any typos/mistakes, or any broken links I would really appreciate the feedback!
1. The Basics
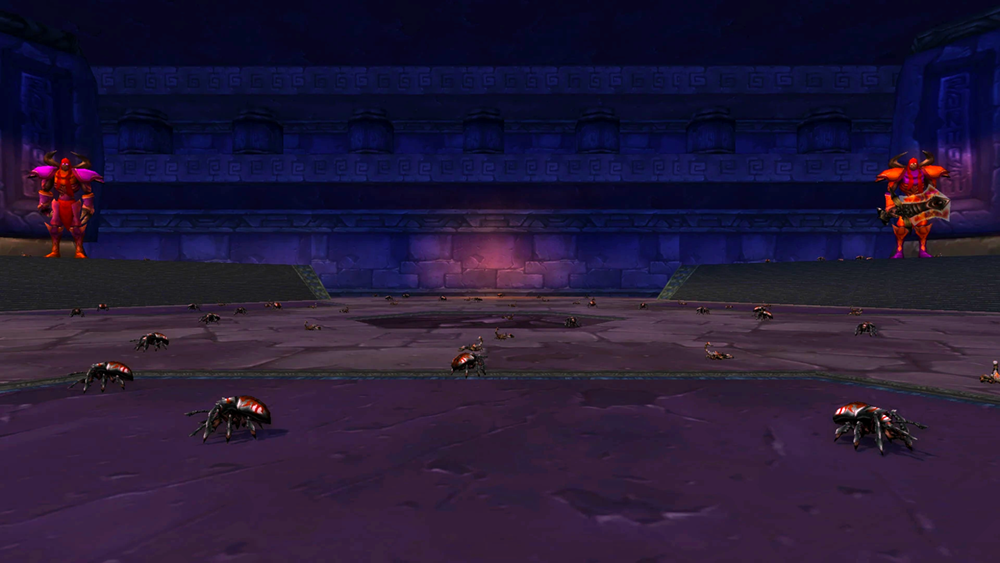
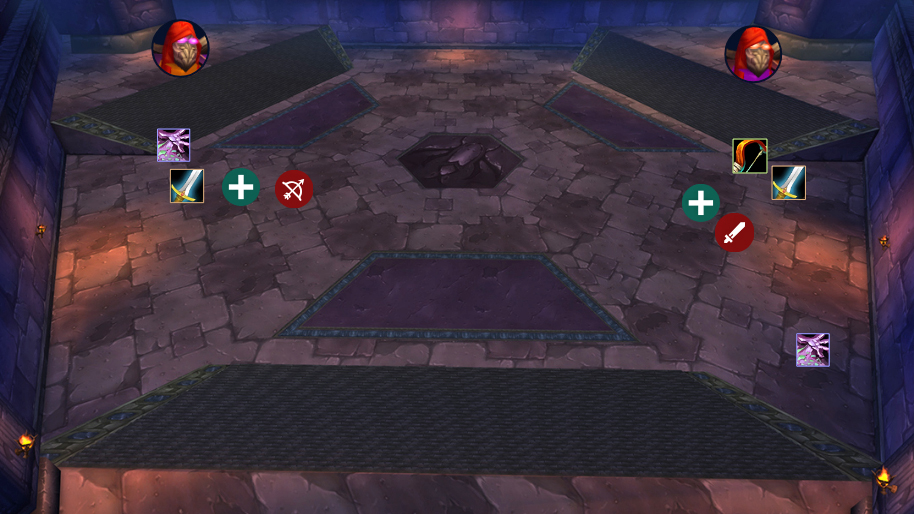
Twin Emperors, as the name suggests, is a fight with two bosses: Vek'lor (caster boss), and Vek'nilash (melee boss). It is a required boss, situated after Huhuran, and opens the door which leads to Ouro and C'thun.
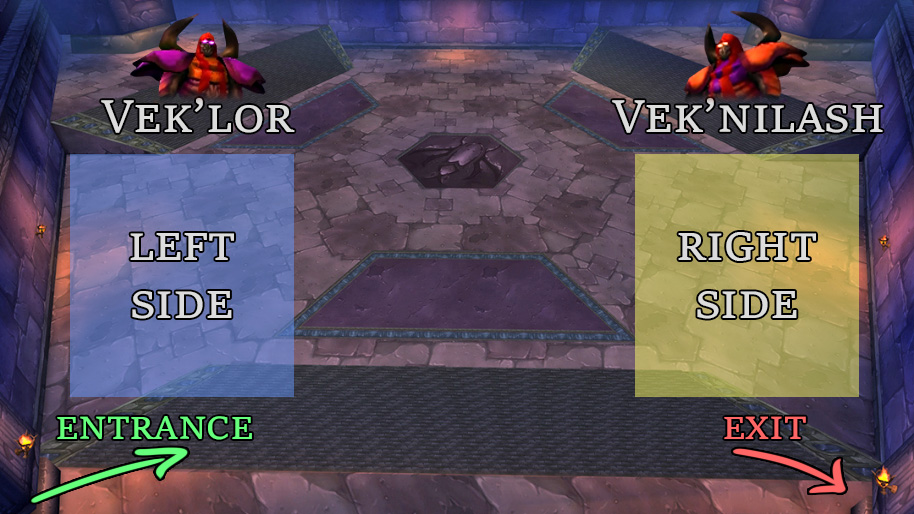
Here we see the boss starting positions, Figure 1. You will either be the "left side" or "right side" Warlock tank, and will stay within those areas. We'll see this in much more detail in the Positioning section.
The fight typically lasts between 3 to 5 minutes. It is not a DPS race, the enrage (Berserk) timer is 15 minutes - you must kill the bosses in this time, but that should not be an issue. Vek'lor and Vek'nilash share a percentage health pool, damage to one will hurt the other, so it is okay if your raid is heavily skewed towards magical or physical damage.
The final shared mechanic is Heal Brother. If the bosses are within 60 yds they will spam heal each other for 300k per cast. This is why we tank them on opposite sides of the room.
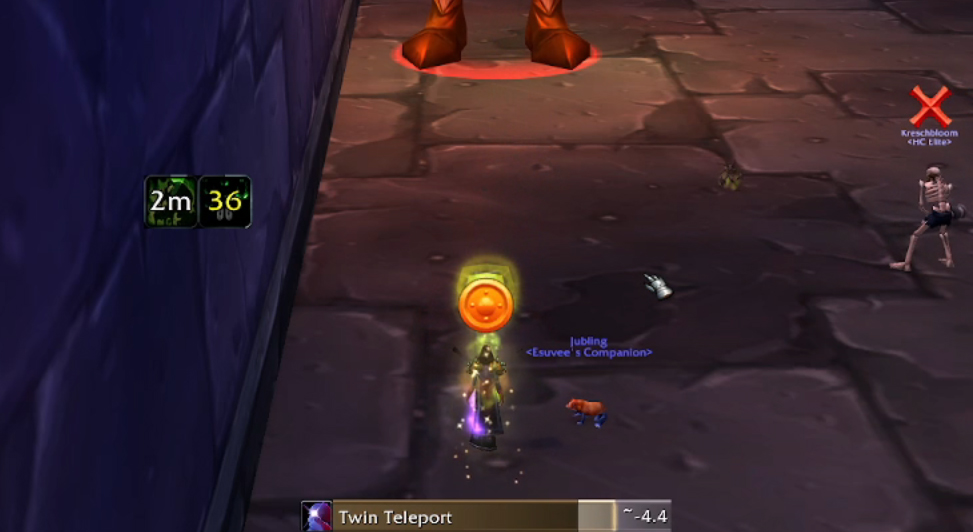
1.1 Twin Teleport
The most fundamental mechanic of this fight is the Twin Teleport. Perodically the bosses will Teleport, swapping positions. All Threat is reset, and whoever is closest to a boss will gain 2000 Threat for that boss. While you are waiting (AFK Phase), i.e. Vek'nilash is on your side, you must ensure you are ready to begin tanking Vek'lor immediately after the Teleport.

The Teleport timing is random, and will happen any time during a ~11 second window, starting ~29s after the previous Teleport. DBM's data suggests the earliest Teleport (window open) is after ~29.2s and the latest is ~40.2s (window closes). Figure 2, shows how my DBM timer looks for the Twin Teleport. The transparent part of the timer represents the time until the Teleport window opens, and the highlighted portion on the right side is the maximum possible duration of the window.
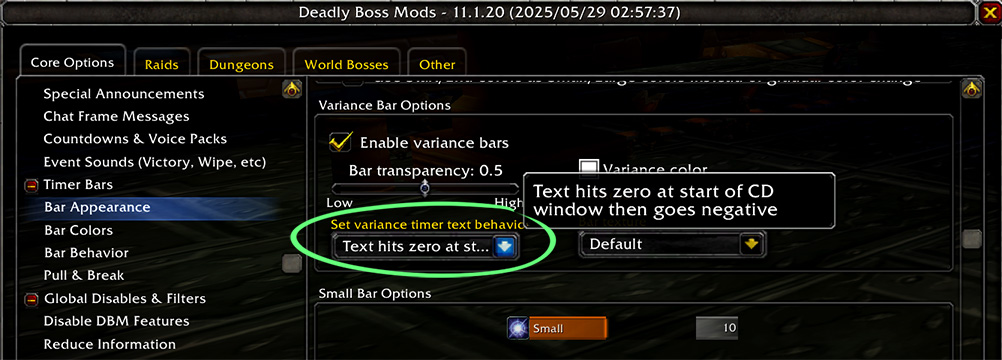
Depending on how your DBM is configured, or if you are using a different addon such as BigWigs, your timer may look different. In Figure 3 you can see how I configured my timer to countdown until the window opens, instead of the default of until it would close. This is down to personal preference, and the way addons look is likely to change in the future.
When they Teleport it is imperative that all DPS are away from the bosses, and have no large DoTs (e.g. Ignite) rolling. This can result in the bosses moving, and possibly killing people.
1.2 Vek'lor
Emperor Vek'lor is the caster boss; he is immune to all physical damage. This is the boss we Warlock tank. While it is technically possible for other classes to tank him (e.g. a Paladin spamming GBoK), we will not cover that - Warlock is by far the safest choice.
Shadow Bolt
1.6s cast time, deals 3500-4500 Shadow damage.
Mitigated by our Shadow Resistance (SR) gear.
Blizzard
A 10s AoE, dealing 1388-1612 Frost damage per 2s.
Also slows the movement of those hit by 30%.
Mitigated by our GFrPP.
Explode Bug
Picks a Scarab/Scorpion within 30 yds to Explode after 4s.
This deals 2813-3187 Fire damage in a 15 yd radius.
Mitigated by our GFPP.
Arcane Burst
Instant cast 10 yds AoE, dealing 4050 Arcane damage.
Also knocks targets backwards and slows them by 70% for 8s.
Mitigated by our GAPP.
If this spell is cast it means that Vek'lor is in Melee Mode.
We will discuss in more detail how to deal with the Blizzard and Explode Bug mechanics in the Step-By-Step Tanking a Phase section.
1.3 Vek'nilash
Emperor Vek'nilash is the melee boss; he is immune to all magic damage (except Holy). For completeness I will list his abilities, however it is the Warrior tank on your side's job to tank him. We should never have to interact with Vek'nilash.
Uppercut
Deals ~1000 damage and knocking back the target.
If this moves the tank, it may cause the boss to move.
Be aware of this since it could require us to reposition.
Unbalancing Strike
Big damage and reduces the target's Defense by 100 for 6s.
May cause trouble for undergeared tanks/healers.
Mutate Bug
Picks a Scarab/Scorpion within 30 yds and enrages it.
These bugs deal 1800% damage and have 300% HP.
As a Warlock we should try to ignore these.
1.4 Roles
For the strategy presented here we require:
- 2 Warrior tanks, one for each side to tank Vek'nilash.
- 2 Warlock tanks, one for each side to tank Vek'lor.
- Someone to pull Vek'nilash at the start of the fight, ideally a Hunter.
You will also have healers split between the left/right sides.
While it is possible to tank Twins with a single Warlock, situated in the middle of the room and swapping sides, I will not cover it here. That setup is not recommended, since our goal is a consistent and safe strategy.
Note that throughout this guide I refer to "Warrior tanks" to distinguish them from the Warlock tank, however it is possible for a geared Feral Druid to tank Vek'nilash instead of a Warrior.
Warlock is the canonical choice for tanking Vek'lor: Each point of Searing Pain damage generates two Threat (2x modifier), Demon Armor provides extra SR, we have Shadow Ward for extra mitigation, and our Talents allow even more survivability/Threat.
2. Step-By-Step Tanking a Phase
In this section we will cover your rotation, and how to handle a tanking phase. For where to stand, with annotated images, and example videos of tanking left/right side, please see the Movement and Positioning section.
Before the fight begins please double check:
- Your SR set is equipped.
- You have Prayer of Shadow Protection, with at least 6 minutes left.
- You have Gift of Arthas, GAPP, GFrPP, and GFFP. We will discuss these consumables in more detail in the Consumable List section.
- Blessing of Salvation is removed (Alliance only).
To remove Salv I use the following macro:
/cancelaura Blessing of Salvation
/cancelaura Greater Blessing of Salvation
Some people like to include this in one of their ability macros, however personally I just have it on my bars and manually click it a few times before the pull.
2.1 Pre-Teleport
Let's start from before Vek'lor teleports to you. The Warrior on your side is tanking Vek'nilash and you are waiting for the Teleport. There is no need to rush, you have around 20-30s to prepare before the next phase:
- Life Tap back to full mana. It takes approximately 4000 mana to tank each phase, so you should NEVER Life Tap while tanking Vek'lor. You can do this now, during your AFK phase.
- Stand in the correct place (see Movement and Positioning), you may have to adjust a little.
- Before the window opens cast Shadow Ward. This will help with mitigation for the first Shadow Bolt you recieve after taking aggro of Vek'lor.
- Ensure you have Vek'lor targeted. Remember, this boss is currently on the opposite side.
- Before the Teleport window opens start spamming Searing Pain. This ensures you begin your cast as soon as possible after Teleport.
2.2 Teleport
Vek'lor has teleported and you should have immediately started casting Searing Pain. Assuming DPS all left before the Teleport, the Warrior will have ~2.1k Threat on Vek'lor - this is the initial Threat that the closest player gets (modified by Defensive Stance). The boss be inactive for ~1.5s, during this the Warrior should immediately run out to a similar distance as you.
- Keep casting Searing Pain.
- Vek'lor should not move, and will begin casting Shadow Bolts on the Warrior tank. This is normal. It is okay for the Warrior to take 2-3 Shadow Bolts before you are top Threat - your healers will be prepared for this.
- After 3-4 casts you should overtake the Warrior and be the top Threat.
- Keep casting Searing Pain.
If Vek'lor starts running at you, or the Warrior, or casts Arcane Burst, he may be in Melee Mode. If everyone is follows the strategy this is extremely rare, however please see the Melee Modesection for some suggestions about how to handle it.

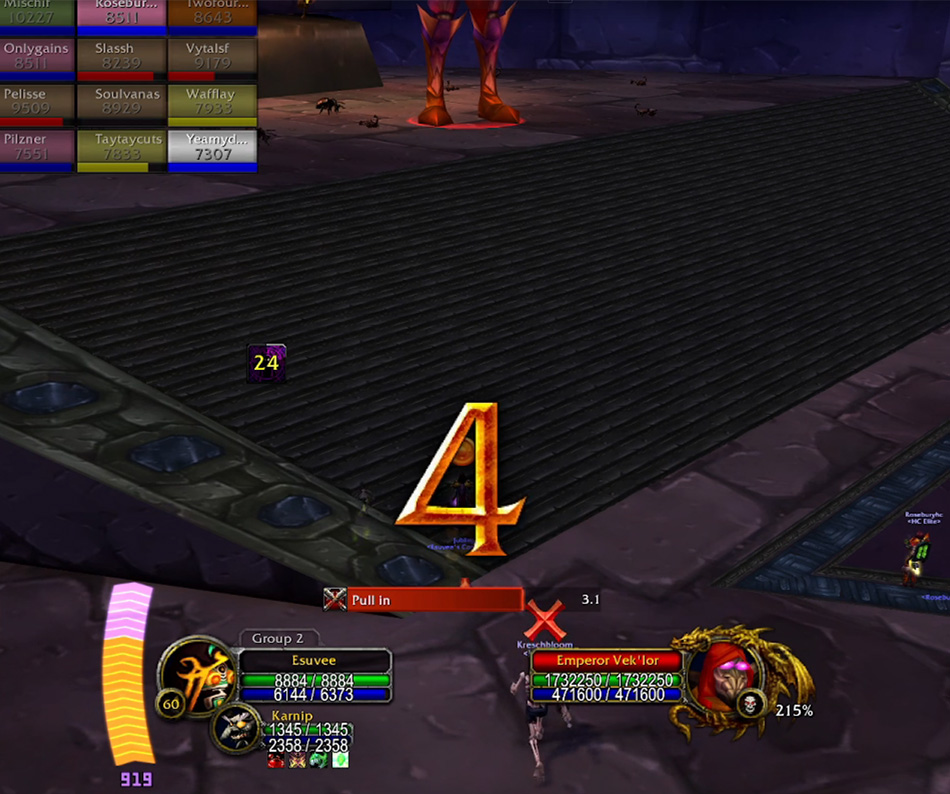
I use a WeakAura that I wrote to announce in /yell if my Searing Pain resists when casting on Vek'lor. Figure 4 shows how it looks. It is not required, but it is useful for indicating to the healers that you are having a tough time overcoming the initial Threat of the Warrior tank. You can import it here: Vek'lor Searing Pain Resist
2.3 Explode Bug
Vek'lor will periodically cast Explode Bug. A fire animation will appear on the exploding bug, before it grows in size and then explodes. Figure 5 shows this fire animation.

At this point you have a few options, and must make a judgement call:
- Tank the Explosion: If the bug is too close, or you can't avoid it due to the wall or Blizzard, you can ignore it and take the damage. If your GFPP is fully active you should absorb most of it.
- Move: If the bug is not right on top of you then you may be able to move to avoid it.
- Death Coil: RNG option to make the bug move away from you. This requires quick reactions, and swapping targets, so I do not advise it for your first time tanking Twins.
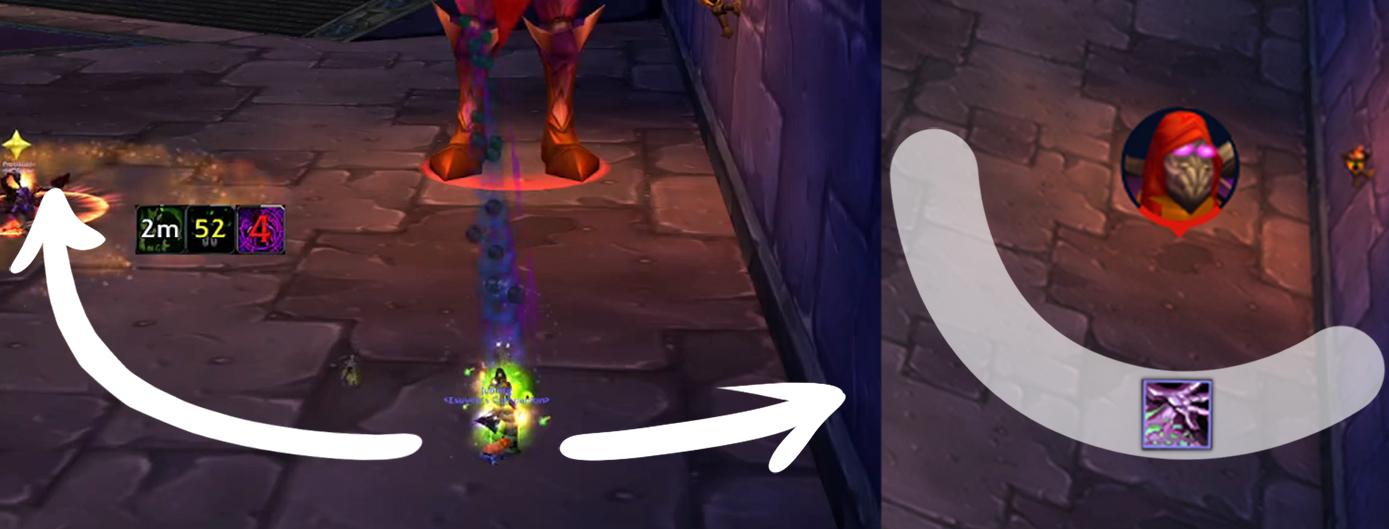
If you are moving away from the bug, it is important you follow an arc that keeps your distance to Vek'lor fixed. If you move out of his range he will chase you triggering Melee Mode. If you move too close he may enter Melee Mode and Arcane Burst you. Figure 6 shows the circular path around Vek'lor that you should restrict your movement to. If you are in range, while moving you could Shadowburn to compensate for the lost casts. However, this is likely unnecessary unless someone is close on Threat.
If you take the explosion damage, and your health drops low you can use your Healthstone. This is particularly useful if you are facing multiple mechanics at once, for example Blizzard and Explode Bug and a Shadow Bolt from Vek'lor. Keep in mind that your GFPP is now gone. You can either pop a new GFPP or save your potion CD. If you choose to save your potion CD, be ready to drink a GFPP if another Explode Bug is nearby - before you take damage from it.
Using Death Coil is a more advanced play. It has to be a quick reaction, and it is inconsistent due to the random direction the bug will move. However, it can be a useful tool if you cannot move, and pulling it off will make those who see it consider you a pro-gamer. Video 1 shows me performing the Death Coil.
A good healer will notice you are about to take Explode Bug or Blizzard damage and start a big heal or Power Word: Shield you. A call of "big heals on me" or a healer saying "big heals on your-name" is great to ensure everyone knows the damage is coming.
The Warrior tank is AFK for most of this phase. If they are experienced with the fight they will kill the Scarabs/Scorpions around you, so that none are near enough to explode on you. Be aware that they do respawn.
2.4 Blizzard
Unlike Explode Bug, you should NOT stay still and tank the Blizzard. It ticks for ~1500 Frost damage. Your GFrPP will mitigate the first, and maybe the second, tick. You should move as discussed before, see Figure 6, to ensure you are a consistent distance from Vek'lor.
It is not impossible to tank the Blizzard, but know you will be taking ~8000 damage over 10s (5 ticks). If you absolutely must stay in it, wait for your active GFrPP to be used up then pop another one. You will need really big heals during this time, and I really do not recommend it unless there is no other option. Remember you have Healthstone if you are taking a lot of damage.
Blizzard always spawns on a player. This is why in Movement and Positioning we will see that we are away from the DPS stack. This greatly reduces the chance it spawns on us. However, you may catch the edge of a Blizzard that has spawned on the Warrior tank or a healer.
In Video 2 you see an example of me moving out of Blizzard. We get the worst RNG here and an Explode Bug happens right where I move towards. I choose to tank the explosion since I consider avoiding the Blizzard a higher priority.
2.5 Curse of Doom
A bonus tool to help with initial Threat is Curse of Doom. Due to the variation of Teleport timings, it is not going to work consistently. The idea is to cast Doom while tanking Vek'lor, and it will pop during your next tanking phase.

The timing is not perfect, and it will take trial and error. I have found that casting around 20s before the Teleport window opens (~10s after the boss appears) works well, see Figure 7.
If you cast a little early, it will simply pop near the end of the other Warlock's tanking phase. That Warlock should have a lot of Threat, so there is no risk.
If you cast a little late it will still pop on your side, but it will be later into the tanking phase. This still boosts your Threat, but you likely already have a comfortable lead at that point.
If my 20s timing isn't working, I recommend trying ~17/18s before the Teleport window opens. You can then gradually be greedier (earlier) as you get a feel for it.
If Curse of Doom resists, or it is your final tanking phase, you can cast Curse of the Elements. This marginally helps both you and the opposite side Warlock overcome the 2k initial Threat. However, it will not always change the number of Searing Pain casts required to overtake the Warrior. You can also just use Elements if you don't want to have to think about Curse of Doom - just make sure you have a Threat lead before initially applying it.
If you have a 3rd Warlock (a non-tank), you likely already have Elements up. In that case, the backup would be Curse of Shadow. Often Mages will swap to Arcane Missiles to ensure Ignite falls before the Twin Teleport. It is minor, but it does increase that damage.
2.6 Ending a Phase
If you keep casting Searing Pain right up until the boss Teleports away, there is a very small chance that your final cast will land during the same 10ms spell batching window as the Teleport. If this happens, you could be top threat on Vek'lor after he appears on the opposite side. This is rare, but I have seen it a couple of times.
Once the Teleport window opens, DPS will stop (they swap sides) and you no longer need to build Threat. For safety I stop casting Searing Pain after the Teleport window opens. You can just wait for the Teleport, still avoiding mechanics of course. Keep an eye on the Threat meter to ensure there aren't any DoTs that might cause a DPS to overtake you - although this has never been an issue for me.
It is crucial that the Warrior tank is closer to the boss than you when the Teleport window opens. Otherwise you will get the initial Threat from Vek'nilash. In Figure 8 you can see the Vek'nilash tank has moved closer than me in preparation for Teleport. It's important to pay attention to this, so you can reposition to compensate if necessary.
Congratulations! You just tanked a phase! Now loop back to the start of these steps and await the next tanking phase!
3. Movement and Positioning
In this section I'll show the positioning for the left/right sides, along with an explanation of the pull. This is where our strategy deviates from most common Twin Emps strategies. In many guides you are shown a Warlock kiting Vek'lor on the pull. We will not do this. Instead all boss movement is done by the Warrior tank. This eliminates two huge issues:
- Kiting a caster mob to a precise location is very inconsistent.
- Kiting Vek'lor requires outranging him, which in many cases forces him to enter Melee Mode.
As you will see we require zero boss positioning from the Warlock tank, resulting in a simple and easily reproducible strategy.
3.1 The Pull
As discussed in the previous section, it is crucial that you double check you have your SR set equipped, consumables popped, and Blessing of Salvation removed before the pull begins. It is the Left Warlock tank that will be pulling Vek'lor, the Right Warlock tank can be in their final tanking position before the fight begins and wait there for their tanking phase.
In Figure 9 you see the pre-pull positioning. As the Left side Warlock you want to start out of Searing Pain range just before the corner of Vek'lor's staircase. I recommend at least a 10s pull timer, so that you can pull Vek'lor at the same time as the Hunter pulls Vek'linash.
Once the pull timer begins:
- Cast Shadow Ward
- Target Vek'lor
- Step onto the corner of the staircase, and with ~4-5s remaining tap forwards until you see your Searing Pain icon show that it is in range. Figure 10 shows me on the corner of the staircase, barely in range to Searing Pain.
- When the timer is at ~1s begin casting Searing Pain.
- Do not kite Vek'lor, stay in position and tank this like a normal tanking phase.
Over on the right side the Hunter will be timing their pull to hit Vek'nilash at approximately zero on the pull timer, the same as you. A typical pull for the Hunter might be Aimed Shot, Auto Shot, Multi-Shot; enough to hold Threat off of the healers until the Warrior tank picks up Vek'nilash. Once the Hunter has fired their combo they will immediately run backwards towards the Right Warlock, and the right side Warrior tank will run in and pickup the boss. The right side Warrior can then bring Vek'linash to the right side's final tanking position, the torch on the wall being a useful indicator.
Now the pull has begun, and Threat established, DPS will begin to attack and the Warrior tank on the left side will move closer than you to ensure the initial Threat after the first Teleport.
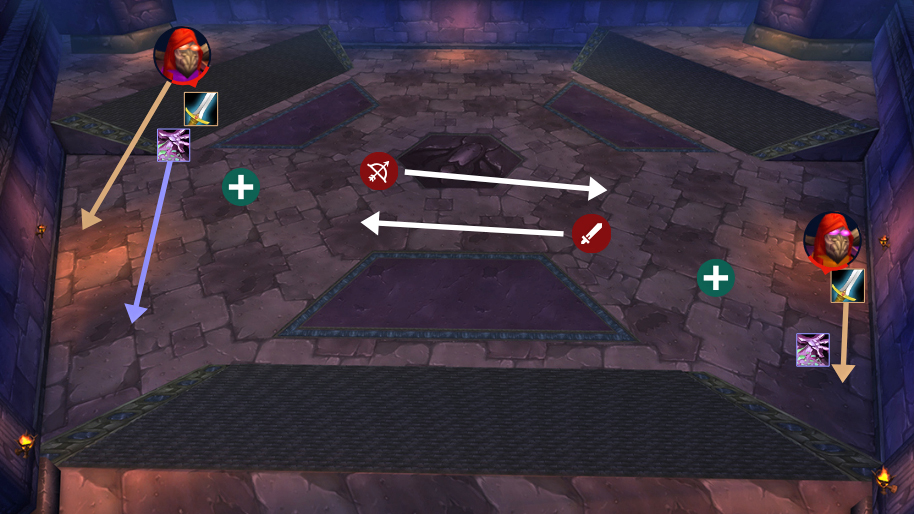
Figure 11, shows how the positioning will look immediately after the first Teleport:
- The Warrior tank on the left side has initial Threat on Vek'nilash and is about to bring him to the final tanking position, over by the torch.
- The Left Warlock is moving back into their final tanking position.
- The Right Warlock has begun their first tanking phase.
- The Warrior tank on the right side is moving out of Vek'lor's melee range, immediately after the Teleport.
- The Caster DPS and Melee DPS are swapping sides.
At this point the pull phase is complete, and we are into the main stage of the fight. Notice that boss repositioning was always done by the Warrior tanking Vek'nilash, never Vek'lor. If Vek'lor gets out of position, generally you can adjust to the new position and wait for the Warrior tank to reposition during their next tanking phase.
In Video 3 the Left Warlock's PoV is shown, and included in this is a demonstration of the pull.
3.2 Left Side
In Figure 12 we see the typical positioning of left side during their normal tanking phase (not the pull).
If you are running SM/Ruin, or another spec that provides Blood Pact, you will start with your Imp on follow for the pull. After the first Teleport, while you are moving into position you can set your Imp to stay roughly mid-way between the torch (boss position) and your tanking position. This ensures both you and the Warrior tank have Blood Pact. It is crucial that your Imp stays Passive and Phase Shifted, i.e. beware your any pet attack macros.

A common question is "How far should I be from Vek'lor?". The floor at the sides of the rooms is divided into alternating large plus shaped tiles, and smaller square tiles. My rule of thumb is, 1 large + 1 small tile from the boss, as shown in Figure 13. You can be a touch further than this if you wish, but try not to be closer.
Video 3 shows a full Twin Emps fight from the PoV of the Left Warlock tank.
3.3 Right Side
The Right Warlock's positioning is a mirror image of the left side, except of course you do not do the pull. You can be in your final tanking position before the fight even begins.
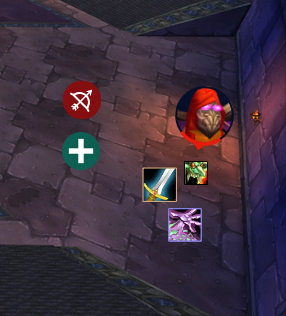
Figure 14 shows the right side positioning. If you are running Imp (i.e. SM/Ruin) before the fight begins you can position him as shown, between you and the torch, on stay. As before it is important your pet remains Passive and Phase Shifted. In terms of how far you should be from the boss, use the same 1 large + 1 small tile approximation shown in Figure 13.
Video 4 shows a full Twin Emps fight from the PoV of the Right Warlock tank.
3.4 Warrior Movement
The Warrior tank's movement is crucial on this fight. You have a good perspective on their positioning, better than they do, if something can be improved gently let them know - remember a Warrior's resource is Rage!
Vek'nilash Teleports away: Immediately after Vek'nilash Teleports away and Vek'lor appears the Warrior must run out of melee and Arcane Burst range. Vek'lor does nothing for the first 1-2s after Teleport, this is the window they have to move. They can run to the Warlock tank as a guide. Failure to get far enough away quick enough can cause the boss to enter Melee Mode.
Teleport window opens: Before the Teleport window opens the Warrior tank must be the closest player to the boss, to get the initial Threat. That does not mean in melee range of Vek'lor. As before Vek'nilash will be inactive for the first 1-2s during which time they can run in and connect.
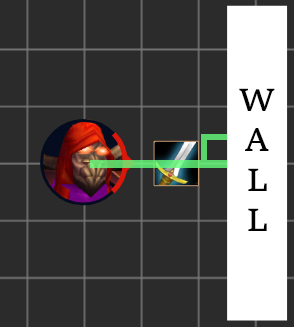
Uppercut knockback: If the Warrior tank is Uppercut right in the Teleport window then it can cause Vek'nilash to move out of position just before the Teleport happens. Even if their back is to the wall, tanking at an angle can cause them to be knocked along the wall. If a drawn line through Vek'nilash and the Warrior tank is perpendicular to the wall, then the Warrior will be knocked directly back into it and not be moved, see Figure 15. This positioning is optimal.
Explode Bug: While the Warlock is tanking, but prior to the Teleport window opening, the Warrior tank can kill the Scarabs/Scorpions nearby the Warlock. This greatly reduces chance of taking explosion damage.
4. Consumable List
In addition to your normal buffs and raid consumables, for this fight you should bring:
1x Gift of Arthas
+10 SR for 30 minutes.
Drink this before the pull.
2+ Greater Fire Protection Potion
Absorbs 1950 to 3250 Fire damage.
I use a GFPP as soon as I reach the Twins room.
You can refresh this if you take Explode Bug damage.
2+ Greater Frost Protection Potion
Absorbs 1950 to 3250 Frost damage.
I drink my GFrPP after pre-Huhuran trash.
You can refresh this if you take Blizzard ticks.
2+ Greater Arcane Protection Potion
Absorbs 1950 to 3250 Arcane damage.
If your raid is fast, this may still be up from Skeram.
While Melee Mode is rare, this softens Arcane Burst.
1x Limited Invulnerability Potion
Physical immunity for 6s.
Almost never needed, but should be available just in case.
Saves you if you get Vek'nilash initial threat
Last resort option for Melee Mode.
As stated previously, you want Gift of Arthas, GFPP, GFrPP, and GAPP all active before the fight. I do not use GSPP, since our SR gear will mitigate the Shadow Bolts. There is no harm in having a GSPP up prior to the fight, but I would never waste my potion CD on it during the fight. We Shadow Ward before a tanking phase to soften the first hit and allow healers a chance to swap targets.
Additionally you want to use your standard raid consumables:
- Spirit of Zanza: Lung Juice Cocktail if you don't have the rep.
- Flask of the Titans: I recommend this for progression, or your first try on a character. After that you can judge based on how low you are getting.
- Stamina Food: A 12 stam food, or Chimaerok Chops (25 stam) if you have access to them.
- Rumsey Rum Black Label: ONLY IF YOU KNOW ALCOHOL DOES NOT DISCONNECT YOU.
- Elixir of Fortitude: 120 HP can absolutely make a difference.
- Elixir of Superior Defense: As a clothie the extra armor genuinely makes a big difference if you are ever meleed.
- Elixir of Greater Firepower: Releases the same phase as AQ, if unavailable use Elixir of Firepower.
- Brilliant Wizard Oil: Releases the same phase as AQ.
- Major/Minor Troll's Blood.
- Mageblood Potion: Not actually needed on this fight, since ~4k mana is enough.
- Greater Arcane Elixir.
- Elixir of Shadow Power.
Remember if you are on a server with a buff cap (e.g. old Classic Era servers), be mindful of which consumables you are using. This is not a concern in HC, or on Anniversary servers, where there is no buff cap.
In terms of player buffs, you of course want Demon Armor: 15 SR, extra armor, and HP regen. All your standard raid buffs, except Salv. Ensure you have enough time on Prayer of Shadow Protection (60 SR), no less than 6 minutes - it doesn't hurt to have it refreshed before the fight.
On Alliance, I highly recommend the Paladin in your group runs Devotion Aura. Their SR Aura doesn't stack with Prayer of Shadow Protection, and Concentration Aura is a negative in my opinion (see Spell Pushback Analysis). The FR Aura can be nice for the Explode Bug, but Devotion Aura could save your life in Melee Mode. Melee Mode is a hectic situation, you want Devotion Aura already up so the Paladin can focus on healing.
Frequently people ask about Crystalline Basilisk Spine. It gives an extra 10 SR but only for 1 minute, and it has a 2 minute CD. I really do NOT recommend this. Firstly, it makes your SR inconsistent. More importantly, it shares a CD with Healthstone. Healthstone is far more important since it is an emergency button if you get a Blizzard, Explode Bug, and Shadow Bolt combo.
For my first ever time tanking Twins in HC I used both Juju Chill and Juju Ember, to try to mitigate the Explode Bug and Blizzard damage. To be honest, this felt like it had a negligible impact. However, if you have time to burn and want to overprepare it cannot hurt to use them.
5. Gearing
With Demon Armor, Gift of Arthas, and Prayer of Shadow Protection, you have +85 SR from buffs.
Vek'lor's Shadow Bolt follows the non-binary spell resistance mechanism. This means you can partially resist 0%, 25%, 50%, or 75% of the damage, with higher partial resistance probabilities at higher SR. You cannot improve your chance to fully resist, it is fixed at a 1% chance.
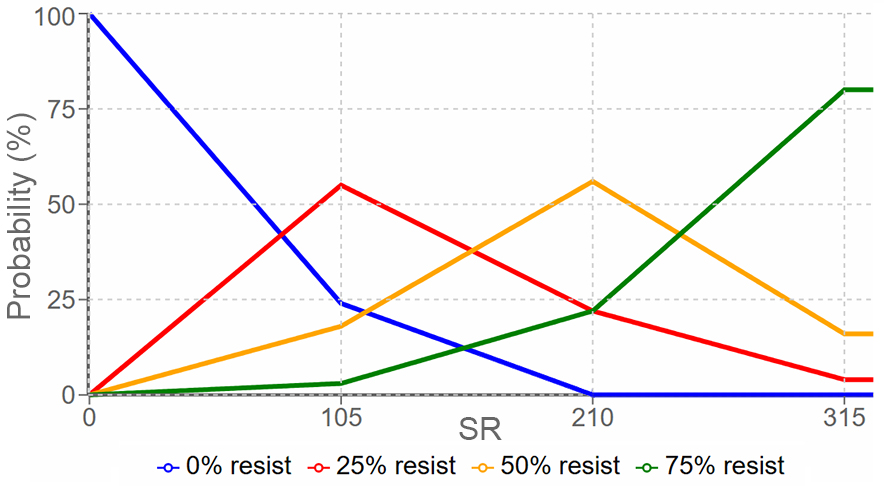
Figure 16 shows the 0%, 25%, 50%, and 75%, partial resist probabilities as a function of SR. Notice that above 210 SR it becomes impossible to take a full damage Shadow Bolt. You must have over 210 SR to tank Twins safely, we will aim for much higher. 315 SR is the resistance cap versus bosses: Being above that value grants no additional benefits.
5.1 Stat Priority
Your highest priority stats are:
- Shadow Resistance (SR)
- Stamina (Stam)
A Warlock tank is of no use if they are dead. You want to optimize both SR and Stam to maximize your "Effective HP". Effective HP means the amount of raw (before resisting) damage that it would take to kill you on average. I recommend Royalgiraffe's Calculator, it's an invaluable tool for understanding what your SR is doing. To set it up you can use the following values:
- Target Level = 60 (our level)
- Attacker Level = 63 (boss level)
- Attacker is NPC = TRUE
- Binary Spell = FALSE (Shadow Bolt is non-binary)
You can then adjust the Resistance and Target Health values to match your in-raid stats. Royalgiraffe's Resistance Guide is superb, and it is my go to resource for any Vanilla WoW resistance questions I ever have.
Effective HP is not everything, just one useful metric. It is important to have high SR regardless of Effective HP to reduce the likelihood of back-to-back 75% Shadow Bolts. Ideally you can have 270+ SR, the higher the better.
Regardless of SR, you must have a high level of Stamina - Blizzard and Explode Bug are not mitigated by our SR. We need a high enough pool of HP to survive them. Let's say you take a max damage Shadow Bolt (75% resisted), a max damage Blizzard tick, and a max damage Explode Bug, all without any heals and no protection potion active: That's ~8170 damage. Now that is unlikely: You should always be keeping track of your GFPP/GFrPP, and be recieving heals and Power Word:Shield. However, it is not impossible. For this reason, I recommend you have at least 8000 HP, irrespective of SR.
Our secondary priority is Spell Hit. Consistent Searing Pain casts are important, specifically for the Teleport to overcome the Warrior's ~2100 initial Threat. However, I do think the requirement for Threat after this point is largely overblown - especially for Hardcore/progression. I've never had issues with staying above DPS, even with bad gear and bad RNG. Realistically it is the responsibility of the DPS to ensure they are watching their Threat meter. That said more Threat is never a bad thing, just don't overly sacrifice on SR/Stam.
Generally speaking, my rough rule of thumb is that I consider a Threat item good enough if provides at least 1% Spell Hit for every ~10 SR lost. I wouldn't want to lose more SR than that for 1% Hit. That said, you must take your full gear setup into account when weighing gear options.
Lowest priority we have:
- Spell Crit
- Spell Power
- Intellect
Crit and Spell Power are okay, but they are no where near as impactful as Spell Hit in terms of consistency. The question is, will these items meaningfully change the average number of Searing Pain casts to overcome the Warrior Threat, and the answer is typically no. Intellect is an essentially useless stat for this fight, you should naturally have over the ~4k mana required to tank a phase just incidentally from your other gear.
5.2 Example SR Sets
Let's say you have been farming MC/BWL/ZG and have zero AQ gear. Here is an example SR set you could wear for your first Twin Emps: T2 + Crafted SR

Figure 17 shows the aforementioned example SR set. With world buffs, consumes, raid buffs, and Flask of Titans, this provides over 9000 HP, 284 SR, and 4% Spell Hit. These values do NOT include Blessing of Kings or other faction specific buffs. I have assumed we have the +42 Stam from Blood Pact, which contributes ~500 HP.
I purposefully omitted Juno's Shadow and Eidolan Talisman, as these are rare/expensive BoE items. I also omitted the fantastic +10 SR leg/head enchants since these may not be available if you are not in Naxx content phase yet. Alternative items, and enchants, are detailed in the Item Alternatives/Options section. Note that Sixty Upgrades does not understand the Deathmist 2-set bonus.
For comparison, here is how an end-game SR set might look like with all content available: End-Game SR

Figure 18 shows this example SR set. With world buffs, consumes, raid buffs, and Flask of Titans, this provides over 9200 HP, 296 SR, and 11% Spell Hit. Again, this is without Kings or faction specific buffs.
As Alliance I would be much more comfortable not running Flask of the Titans with these sets, after having beaten Twins a few times of course. Without Blessing of Kings Horde has a tougher time, but you can lean more heavily into Stam pieces and less into Hit.
5.3 Item Alternatives/Options
I will now list some alternative options for each gear slot. I will not necessarily list every possible item in the game, especially for cases where it is not a SR set specific piece, for example I list the T2.5 helm but not T3 since it is functionally similar just slightly stronger. After listing gear items for each slot I also suggest enchanting recommendations (where applicable).
This is not a strict ranking of items. While loosely ordered best-to-worst, some items are more focused on Stam, SR, or Hit, respecively. You must judge for yourself which fits best with your current setup.
5.3.1 Head

Doomcaller's Circlet
+27 Stamina
+1% Spell Hit
+1% Spell Crit
+33 Spell Power
Source: AQ40
Once you have more SR you may wish to swap to this, or T3 Head, for the extra 1% Hit. Note that the tier token is contested by Warriors, so we are low prio.

Nemesis Skullcap
+26 Stamina
+10 Shadow Resistance
+32 Spell Power
Source: Onyxia
Excellent item, possibly replaced with T2.5/T3 Head for the extra 1% Hit. You may even keep using this with a +10 SR enchant.
Felheart Horns
+27 Stamina
+20 Spell Power
Source: MC
Worse than T2 but has high stamina. Typically very easy to get. I would rate this a little higher than Mish'undare.

Dragonskin Cowl (of SR)
+12 Stamina
+15 Shadow Resistance
+18 Spell Power
Source: UBRS
The best non-raid option, although getting the correct suffix is quite uncommon.
I do NOT recommend Spellweaver's Turban. Yes it has Spell Hit, but it has zero Stamina. If you have no raid gear, I would much prefer any high Stamina item, even if it is just an Uncommon BoE item.
For Head enchants we have a couple of options:
- Shadow Guard: +10 SR, but sometimes pricey to get. Releases with Naxx content.
- Hoodoo Hex: +10 Stam is decent, and if this is your main DPS Head it might be the way to go.
- Lesser Arcanum of Constitution: +100 HP is okay, and this is an alternative if the above are unavailable. You can also consider the Lesser Arcanum of Voracity, for +8 Stam, but the Librams are often expensive.
5.3.2 Neck

Amulet of Shadow Shielding
+18 Stamina
+20 Shadow Resistance
Source: Red Scepter Quest
Easily the best SR Neck. It requires Neutral with Brood of Nozdormu, so you could use this in your first Twins clear if your guild spends some weeks doing the first few bosses before progressing. You need the Only One May Rise quest before being able to loot the Head of Broodlord Lashlayer in BWL, so make sure to get that started.

Eidolon Talisman
+9 Stamina
+15 Shadow Resistance
Source: BoE from DM:W
Very rare drop from the ghosts in Dire Maul West, and I believe won't drop prior to the AQ content phase. This is likely very expensive on the AH.

Felstone Good Luck Charm
+13 Shadow Resistance
Source: WPL Quest
Quest reward from the Two Halves Become One quest chain in WPL. Very easy to get, but has no Stam. Both factions can get this, although they start from different NPCs.
There are also numerous Neck items with a little Stam and 1% Spell Hit from dungeons and ZG. They can be an okay alternative if you cannot get any of the above.
5.3.3 Shoulders

Doomcaller's Mantle
+20 Stamina
+1% Spell Hit
+28 Spell Power
Source: AQ40
Once you have stronger SR gear you may wish to swap to this, or T3 Head, for the extra 1% Hit.

Felheart Shoulder Pads
+25 Stamina
+7 Shadow Resistance
+9 Spell Power
Source: MC
Usually easy to attain, lots of stamina, and some SR. A very nice item.

Argent Shoulders
+23 Stamina
+5 Shadow Resistance
Source: Tailoring
5 Mooncloth is quite expensive, but this is an option if you have no raid gear.

Deadwalker Mantle
+19 Stamina
Source: Scholomance
Not great, but if you really have no other options it does have high Stam for a dungeon piece.
If you don't have T1 shoulders, there are many options that have high stamina. I would fallback on those if you don't have T1.
For Shoulder enchants we have one clear option:
- Shadow Mantle of the Dawn: +5 SR, decent if you are Revered with Argent Dawn. At Exalted there is also the Chromatic version for +5 to all resistances.
However, +5 SR is not a ton. If these are your main DPS shoulders and you have the Zandalar Signet of Mojo, or Power of the Scourge, on them that is generally fine. If it's just for Twins though I would recommend the AD enchant. There is also Fortitude of the Scourge from Sapph, with +16 Stam, but good luck getting that - if you have it you probably didn't need this guide!
5.3.4 Back

Cloak of Untold Secrets
+21 Stamina
+20 Shadow Resistance
Source: AQ40
Easily the best SR cloak. It drops off of Fankriss, so even if you are doing Twins on your first AQ40 clear bring enchanting mats just in case! The enchant requires the lower level Runed Silver Rod, so make sure your guild's enchanter has this with them.
Juno's Shadow
+10 Stamina
+15 Shadow Resistance
Source: BoE from Stratholme
Very rare drop from trash in Strat, and I believe won't drop prior to the AQ content phase. This is likely very expensive on the AH.

Pale Moon Cloak
+12 Stamina
+10 Shadow Resistance
Source: Strat UD
If you can't get the above two options, this is what I would farm. You can pick it up easily during pre-bis grinding and save it for Twins. Personally I prefer this over the Eidolan Cloak.

Eidolon Cloak
+5 Stamina
+12 Shadow Resistance
Source: BoE from DM:W
Personally I much prefer Pale Moon Cloak, but if you are panicking last minute this may be cheap on the AH.

Dragon's Blood Cape
+22 Stamina
+5 Shadow Resistance
Source: MC
If somehow no melee in your raid need this, then it is an option. I would rank this similar to Juno's Shadow, with this being a high Stam but low SR alternative. If your set has lots of SR, but is lacking Stam, it can be great. If no one else wants it, take it over it being disenchanted.
We have a clear best enchant here:
- Lesser Shadow Resistance: +10 SR. If there is no Astral Essence on the AH you may need to find some items to disenchant.
If for some reason you cannot find an enchanter with +10 SR, you can go with Greater Resistance (+5 all resistances).
5.3.5 Chest

Garb of Royal Ascension
+21 Stamina
+25 Shadow Resistance
+2% Spell Hit
+30 Spell Power
Source: AQ40
The best SR Chest. However, it is an extremely rare drop from AQ40 trash.

Zandalar Demoniac's Robe
+35 Stamina
+1% Spell Hit
+27 Spell Power
Source: ZG
Requires Revered with Zandalar Tribe. Because of the high Stam I would even rate this above T2.5 and T3.

Felheart Robes
+31 Stamina
+1% Spell Hit
+13 Spell Power
Source: MC
Almost as good as the ZG Chest, but may be easier to obtain.

Polychromatic Visionwrap
+20 Shadow Resistance
Source: UBRS
I do NOT recommend this item. Chest is a great slot for us to get a lot of Stam, and this has none. Additionally, there are Uncommon "of Shadow Resistance" BoEs with more SR - and I would not recommend those either.

Robes of the Royal Crown
+19 Stamina
+18 Spell Power
Source: BRD
If you do not have access to raid gear, this is an option. It has a lot of Stam and is not hard to farm.
Generally speaking, if you do not have at least T1 Chest I would recommend you just wear the highest Stam item that you can.
For our Chest enchant we want:
- Major Health: +100 HP.
Generally this or +4 Stats is my recommendation for Hardcore anyway. If you cannot run 100 HP, because you really want to keep +stats on your main DPS gear, it is worse but not the end of the world.
5.3.6 Wrist

Bracers of Arcane Accuracy
+9 Stamina
+1% Spell Hit
+21 Spell Power
Source: BWL
If your set already has lots of Stam you can consider these for the 1% Hit. Comparable to Rockfury Bracers, but I prefer these for Twins since they have very slightly higher Stam.
Nemesis Bracers
+21 Stamina
+15 Spell Power
Source: BWL
Really nice Stam item.

Deathmist Bracers
+12 Stamina
+8 Spell Power
+8 Shadow Resistance*
Source: T0.5
I really like these, when paired with Deathmist Wraps. *The +8 SR is the 2-set T0.5 bonus.
If you're using Deathmist Wraps, likely choose Deathmist Bracers for your first time tanking Twins. It's a nice little bump to our SR without losing too much Stam. If you have lots of SR already, then you cannot go wrong choosing whichever has the most Stam - T2, T1, and ZG tier set Wrists all have a lot of Stam.
For our Wrist enchant we want:
- Superior Stamina: +9 Stam.
5.3.7 Hands

Dark Storm Gauntlets
+19 Stamina
+1% Spell Hit
+37 Spell Power
Source: AQ40
Our end-game BiS gloves. Highly contested C'thun drop.

Deathmist Wraps
+16 Stamina
+1% Spell Hit
+13 Spell Power
+8 Shadow Resistance*
Source: T0.5
These are so good for pre-raid gear. Personally, I wear them on Twins until Dark Storm - even without activating the set bonus. Gloves is one of the few places we can get some Hit without sacrificing too much. *The +8 SR is the 2-set T0.5 bonus.

Nemesis Gloves
+17 Stamina
+10 Shadow Resistance
+1% Spell Crit
+15 Spell Power
Source: BWL
Generally I try to use T0.5 over these. However, if you are struggling with SR you can sacrifice 1% Hit and wear these.
The T0.5 are quite easy to make. However, if you cannot get any of the above I would wear whatever has the most Stam. Some people like Bloodtinged Gloves from ZG, but with 6 Stam less than T0.5 (and no set bonus) I would avoid them. They are okay if you have no other option though.
The Hand enchants are extremely minor:
- Rugged Armor Kit: +40 Armor. Very minor mitigation for Melee Mode. This would be my choice on a Twins only item.
- Fire Power: +20 Fire Power. Searing Pain scaling is not great. Personally I do not think this is worth the enchanting materials.
- Threat: +2% Threat. Again, extremely minor and very expensive. Realistically neither this nor Fire Power are going to change the number of Searing Pain casts required to be top Threat.
- Shadow Power: +20 Shadow Power. No help on Twins, but if these are your main DPS gloves just stick with this.
5.3.8 Waist

Angelista's Grasp
+17 Stamina
+2% Spell Hit
Source: BWL
I love this belt. It's a fantastic source of Spell Hit in an otherwise Hit-starved build, and it has Stam.

Runed Stygian Belt
+10 Stamina
+20 Shadow Resistance
Source: Tailoring
Lots of Shadow Resistance. A solid choice if you don't have Angelista's or need more SR.
Nemesis Belt
+18 Stamina
+10 Shadow Resistance
+1% Spell Crit
+25 Spell Power
Source: BWL
An easy to attain option if you cannot get either of the above. Less SR than Runed Stygian, but more Stam.
If you cannot obtain any of these options you have two choices:
- Wear the highest Stam belt you can find.
- Use Ban'thok Sash. It's only got +10 Stam, and no SR, but at the very least it's getting you +1% Spell Hit.
5.3.9 Legs

Runed Stygian Leggings
+13 Stamina
+25 Shadow Resistance
Source: Tailoring
+25 SR is a lot. Unless you cannot find a crafter I would always go with these. Personally I consider these by far the BiS Legs for Twins.

Felheart Pants
+20 Stamina
+10 Shadow Resistance
+30 Spell Power
Source: MC
Much less SR, but it has more Stam. An alternative if you have high SR or cannot find a Runed Stygian crafter.
If you cannot find either of these two, then I would probably choose whatever tier or other item I have with the highest Stam. There also zero Stam "of Shadow Resistance" BoEs. However, I cannot express enough how strongly I recommend you try to find a crafter or help a Tailor to farm the patterns.
The Leg enchants are the same as Head enchants:
- Shadow Guard: +10 SR. Releases with Naxx content. If available this is a great enchant for Runed Stygian Leggings.
- Hoodoo Hex: +10 Stam. A good option if you have access to the ZG Idol for it.
- Lesser Arcanum of Constitution: +100 HP is okay, and this is an alternative if the above are unavailable. You can also consider the Lesser Arcanum of Voracity, for +8 Stam, but the Librams are often expensive.
5.3.10 Feet

Runed Stygian Boots
+8 Stamina
+20 Shadow Resistance
Source: Tailoring
Fantastic boots, and in terms of Effective HP this is the winner.

Felheart Slippers
+23 Stamina
+7 Shadow Resistance
+18 Spell Power
Source: MC
A high Stam alternative to Runed Stygian, however this is one of the best slots to get a lot of SR in.

High Priestess Boots
+20 Stamina
+10 Shadow Resistance
Source: BRD
If you cannot find a Runed Stygian crafter, and don't have T1 boos, you can farm these. They drop from Princess in BRD. Honestly they are decent, and often overlooked.
As with the Legs, I highly recommend you go with the Runed Stygian here.
For Feet we have a clear best enchant:
- Greater Stamina: +7 Stam.
Assuming we are world buffed, Minor Speed has no effect. The speed increase from this enchant does not stack with Spirit of Zandalar. Even without ZG buff I would still run +7 Stam here: Our strategy has very little movement, and the small movement speed boost is unlikely to change how well we avoid mechanics. It is an option though if you plan to have no world buffs and really want the move speed.
5.3.11 Rings

Ukko's Ring of Darkness
+13 Stamina
+20 Shadow Resistance
Source: AQ40
Requires killing Yauj last on Bug Trio - this is not the easiest kill order and it is unlikely you ever get this. That said it is the best SR Ring with huge Stam.

___ of Shadow Resistance
+17-22 Shadow Resistance
Source: BoE
High level BoE Rings can have up to +22 SR (depending on ilvl and RNG). While not farmable, the AH or your guild bank may have some. These are an excellent way to gain a lot of SR without losing too much Stam. I would try to look for at least +17 SR, ideally 19+. Personally I run two of these.

Seal of the Damned
+17 Stamina
+1% Spell Hit
+1% Spell Crit
+21 Spell Power
Source: Naxx
An extremely good Ring. A great Stam/Hit option if you have lots of SR, although generally I like getting extra SR in the Ring slot.

Ring of Unspoken Names
+12 Stamina
+1% Spell Hit
+1% Spell Crit
+14 Spell Power
Source: AQ20
For tanking purposes, this is effectively a more accessible but lower Stam version of Seal of the Damned.

Zanzil's Seal + Zanzil's Band
+10 Stamina
+3% Spell Hit*
+17 Spell Power*
Source: ZG
3% Spell Hit across two Rings is a lot, however this is providing just +10 Stam and zero SR. If you cannot find BoE of SR Rings this is an option, and then make up the SR in other slots. *Both must be equipped for the extra 1% Hit.

Blood of the Martyr
+15 Stamina
Source: Strat UD
Extremely easy to attain high Stam item from the Aurius' Reckoning quest. If you have none of the above it isn't a terrible choice.

Band of Flesh
+16 Stamina
Source: Strat UD
Essentially the same as Blood of the Martyr, but with Str/Agi instead of Int. This is essentially a last resort item if you cannot find any of the above. Please make sure those in your dungeon run are okay with you taking it; this is typically a melee item.
In my guild people mail high SR BoE Rings they find to my bank alt and I later distribute them to new Warlock tanks. I suspect a similar thing happens in most guilds. Getting ~40 SR from your Ring slots is a great start to your SR set, and I really recommend this approach. If you cannot find them from guild/AH then I suggest using your highest Stam, or Spell Hit, Rings.
5.3.12 Trinkets

Ultra-Flash Shadow Reflector
+20 Shadow Resistance
Source: Engineering
This item is excellent. Personally I run two of these. If you are not Engineering, you should really reconsider - especially in Hardcore. If you are, then get these. The schematic is a rare trash drop in Strat Live, although they are BoE. You might save a lot of gold by buying the Dark Iron Ore (8 per Bar), then clearing BRD and having yourself or a guildie come in to smelt then. For a pair you need 16 Dark Iron Bars (or 128 Ore). Note that the active reflection ability does nothing on Twins.

Neltharion's Tear
+2% Spell Hit
+44 Spell Power
Source: BWL
You may choose to wear just one Shadow Reflector along with this for some Hit. Although, you should note that swapping Runed Stygian Belt out for Angelista's Sash has the same -20 SR for +2% Spell Hit tradeoff while also giving +7 Stam. The Angelista's swap should be the first priority for gaining Hit (if you have it), and then this Trinket if you desire even more.

Demon's Blood
+10 Shadow Resistance
Source: Quest
If you are not an Engineer, this is the best SR Trinket you can access. It's a reward from the long Blasted Lands quest chain that culminates in You Are Rakh'likh, Demon. Beware of this quest chain in Hardcore. It is extremely dangerous. You will need to research the fights and bring a geared group that understands them.

Ward of the Elements
+8 Shadow Resistance
Source: BRD
Alliance only. If you are not an Engineer, I urge you to reconsider your professions. Nonetheless, if the above are not available this does provide some mitigation, and you likely have it already: Reward from the Jail Break! part of Alliance's Onyxia attunement.

Smoking Heart of the Mountain
+7 Shadow Resistance
Source: Enchanting
BoP item for Enchanters. If you are Enchanting, and really refuse to join us in Engineering, this is better than nothing.

Nat Pagle's Broken Reel
+10% Spell Hit for 15s (75s CD)
Source: ZG
A bit of a meme item that promises to vastly improve your consistency in overcoming the Warrior's initial Threat. Unfortunately, the CD is just too long: You can only reliably use it every other tanking phase. While I do NOT recommend this, it is better than nothing. The unusual (and exciting) use cases for this item deserve a guide of their own, however this is not one of them.
Generally speaking, you should be using two Ultra-Flash Shadow Reflectors (or one paired with Nelth's Tear). If you cannot wear any of the above just wear your standard DPS trinkets. The absorb from The Burrower's Shell or heal from Lifestone are interesting, effectively miniature Healthstones, however they are vastly inferior Trinkets to those already listed.
5.3.13 Weapon
Typically you are not going to go out of your way to farm a Weapon (or Off Hand) specifically for Twins. I list these here mostly as a reference for quickly comparing a few options:

Brimstone Staff
Two-Hand
+31 Stamina
+2% Spell Hit
+1% Spell Crit
+113 Spell Power
Source: Naxx
Definitely the best Weapon for Twins, although by the time you have this you likely have already tanked the fight.

Staff of the Ruins
Two-Hand
+24 Stamina
+1% Spell Hit
+1% Spell Crit
+60 Spell Power
Source: AQ20
In terms of DPS stats, this is roughly equivalent to Azuresong Mageblade + Jin'do's Bag of Whammies, but with more Stam.

Jin'do's Judgement
Two-Hand
+10 Stamina
+2% Spell Hit
+27 Spell Power
Source: ZG
Very low Stam for a Two-Hand Weapon. However, it does provide +2% Spell Hit and may be easy to obtain.

Staff of the Qiraji Prophets
Two-Hand
+21 Stamina
+10 Shadow Resistance
+56 Spell Power
Source: AQ40
While this is not particularly good, it does have nice Stam and some SR. If your do not have good Weapons, and this drops on Skeram, then you might consider using it for your first run. However, a Weapon is usually our easiest way to access Spell Hit (this has none).

Soul Harvester
Two-Hand
+16 Stamina
+1% Spell Hit
Source: Class Quest
Considering this is immediately obtainable buy a new 60, it is suprisingly okay. While it's far from the best, I have used this to tank Twins on a fresh character before. It's from the Warlock Sunken Temple Class Quest.

Skull of Burning Shadows
Off Hand
+10 Shadow Resistance
Source: Strat UD
Generally speaking, I do NOT recommend this. However, if you are stuck with only a Main Hand Weapon, and no good Off Hand, then it is quite easy to farm. Note that it is possible to get up to +15 SR "of Shadow Resistance" Off Hands, although they are extremely rare.
As mentioned before, you are typically just going to use whatever Weapon you have available for Twins. Two-Hand Weapons typically have much more Stamina, but you can use a Main Hand + Off Hand just fine. I would choose whichever setup you have access to that provides Spell Hit without compromising on Stam. It's worthwhile holding onto an old Weapon if it provides more Stam and/or Hit than your current DPS setup. If your setup is lacking HP, a Two-Hand Weapon can be a great way to improve that. If you have lots of Stam and SR, then you can lean more heavily into the Spell Hit.
There really is only one impactful Weapon enchant:
- Spell Power: +30 SP. This isn't nothing, but Spell Power is far from the most important stat on Twins. If this is an SR set specific Weapon, and you are strapped for gold, you can skip this Enchant. With limited gold your priority should be the Runed Stygian items and Shadow Reflectors.
5.3.14 Wand

Wand of Fates
+7 Stamina
+1% Spell Hit
+12 Spell Power
Source: Naxx
An excellent source of Spell Hit and Stam, at the cost of -10 SR.

Serpentine Skuller
+10 Shadow Resistance
Source: UBRS
Ideally you picked this up already while farming Jed for your pre-BiS. This is by far the best Wand for Twins, until you get Wand of Fates. Even then, you may choose to continue using this for the extra SR. If you don't have it, farm it. A group farming Jed/Rend will likely love to have you if you are passing on Briarwood Reed (assuming you don't need that too).

Gravestone Scepter
+5 Shadow Resistance
Source: BFD
Far worse than Serpentine Skuller, but it is a guaranteed item if you're getting unlucky. It's the quest reward from Blackfathom Villainy.

Ritssyn's Wand of Bad Mojo
+4 Stam
+11 Spell Power
Source: Strat UD
If you can't get Serpentine Skuller, and you vendored Gravestone Scepter while leveling, this is an option for a little Stam. I believe this only drops once the AQ phase begins on your realm.
If you cannot get the Serpentine Skuller, there are a few Wands out there with Stam on them, including BoE "of the Eagle" Wands - although these are typically expensive on the AH. Don't overfocus on Serpentine Skuller: If you're having a tough time getting it to drop work on the rest of your SR set then revisit it later.
5.4 Runed Stygian Patterns
If you cannot find a Tailor that knows the Runed Stygian crafts, you may need to help your guild farm them. This can be extremely time consuming, and potentially expensive. However, as discussed previously, these items are well worth the trouble.
The patterns are obtained by tuning in lots of 10 Encrypted Twilight Texts to Hermit Ortell in Silithus. He's in a small cave in the South East corner of the zone, just East of Hive'Regal. This is NOT the same as turning Twilight Texts in at Cenarion Hold. The quest you are looking for is the initial True Believers, and it's followup repeatable counterpart Still Believing.
This turn in has no immediately obvious item reward, and no reputation reward. However, after several hours Ortell will mail you Decoded True Believer Clippings. This can contain various scrolls and recipes, but most importantly there is a small chance for it to contain one of the three Runed Stygian patterns:
- Pattern: Runed Stygian Belt: 6x Dark Rune, 2x Felcloth, 2x Bolt of Runecloth, 2x Ironweb Spider Silk, 2x Enchanted Leather.
- Pattern: Runed Stygian Leggings: 8x Dark Rune, 6x Felcloth, 6x Bolt of Runecloth, 2x Ironweb Spider Silk.
- Pattern: Runed Stygian Boots: 6x Dark Rune, 4x Felcloth, 4x Bolt of Runecloth, 2x Ironweb Spider Silk, 2x Enchanted Leather.
I believe each of these patterns has a ~4% chance of appearing in the mail. This means that if you are looking for a specific pattern it will take on average 25 turn-ins (250 Texts) to find that specific item. To attain at least one of every pattern would require on average ~46 turn-ins, however while searching for the final pattern you are likely to find a couple duplicates of the other two.
This may seem like a lot, and it is. However, please note that the patterns are not BoP. So you can sell duplicates on the AH and use that gold to buy the ones you are missing, assuming there are multiple guilds preparing for AQ40 on your server. You may even be able to team up with another guild to swap duplicates, or to combine into farming for a single crafter.
When purchasing a pattern on the AH you should consider the price of Encrypted Twilight Texts and determine whether it is worth your time/gold to farm them yourself or not. Ask your guild for help, it is quite unreasonable for a raid leader to expect you to do all of this alone.
The best strategy is probably to find a Tailor for as many pieces as you can, then farm the missing patterns. As you can see this is quite an undertaking, so a Tailor is well justified in charging a crafting fee!
The materials themself are not terribly expensive, although for a full set you will need 20 Dark Runes. Your guild may be able to help you out here. If they are expensive on the AH, and your guild doesn't have enough spare, form a Scholomance group in-guild and farm them. It should not take too much time. You can either do full runs, or likely more efficient route is clearing trash up to the Hatchlings then reset.
6. Talents
There are many viable Talent builds, and what you use largely depends on:
- Does your realm have Dual Specialization (e.g. Anniversary), and do you want to use it here?
- Are you on a server with a debuff limit (e.g. old Classic Era)? Note that this is not a factor on any Hardcore realms, since there is no buff or debuff cap.
Personally I run SM/Ruin, which is my standard Talent spec for HC raiding. We'll cover many builds, discussing their advantages and disadvantages. I have successfully tanked Twin Emps with all of these the specs listed here, and I am quite sure it would be possible to defeat the fight without a single Talent point spent!
If I was playing with Dual Spec, and was using it specifically for this fight alone, I would Dual Spec Imp Imp.
By far the most impactful Talent is Destructive Reach, for an extra 6 yds range on Searing Pain. Without it pulling Vek'lor at the start of the fight can be tricky, possibly resulting in an unexpected early pull. All of the talent builds shown here have 2/2 Destructive Reach.
6.1 SM/Ruin
First let's look at my favourite build: SM/Ruin
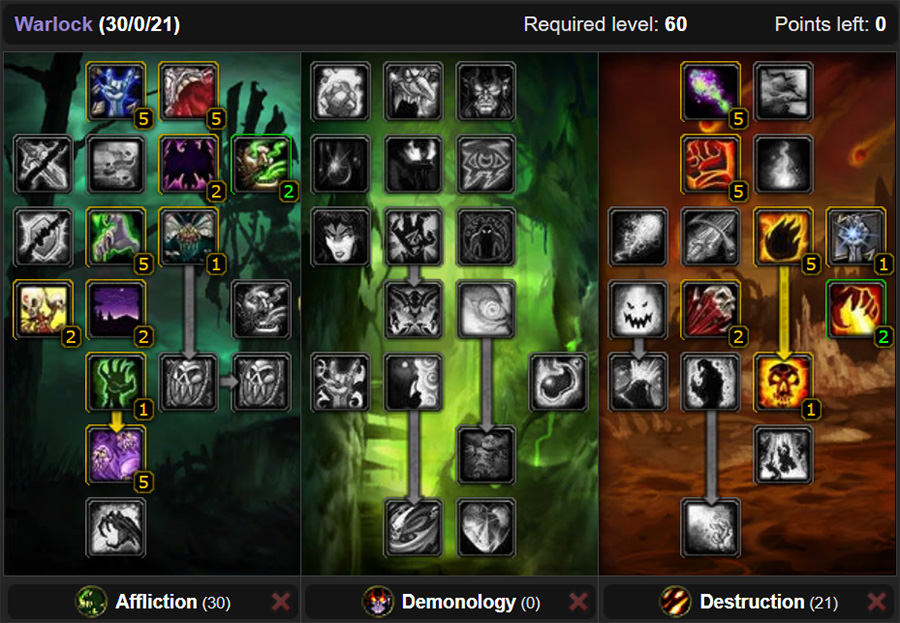
Figure 19 shows a screenshot of the Talents. The core benefit of this build is that it allows us to run Imp. You'll want to keep your Imp Passive and Phase Shifted for Twins, and positioned as discussed in Movement and Positioning.
Advantages:
- Blood Pact provides +42 Stam for both you and the Warrior tank. With world buffs (but not Kings) this is ~500 Health.
- 5/5 Suppression gives +10% Spell Hit to Curse of Doom. Without this Curse of Doom is noticably more unreliable.
- It's an excellent HC raiding spec. You can use SM/Ruin as your main talent spec for HC raiding. In full BiS it is barely behind DS/Ruin on DPS (~3%), you get longer range on Curse, provide Blood Pact, and have a great build for open world content.
- Sufficient Threat output. While this isn't a Threat focused build, I have NEVER had Threat issues using SM/Ruin. It's important to note that while some other builds buff Searing Pain damage (i.e. Threat), they do not increase our Spell Hit. The build has no problem overcoming the Warrior threat. Outside of a fight with DPS pushing close on Threat meters in order to parse this has more than sufficient output.
Disadvantages:
- Not the highest Threat spec. We do have Ruin (crits do 2x damage), and 2/5 Improved Searing Pain (+4% Spell Crit). However, we do not take Demonic Sacrifice or Emberstorm, both of which are large Threat improvements. This can make a difference, especially if you are a fresh tank entering a raid with very geared DPS. However, it is the DPS's responsibility to ensure they do no rip threat.
- Not the highest Stam or SR spec. Our Blood Pact is great, but it is possible to get even more Stam from other builds. Through Master Demonologist it is also possible to gain an extra +60 SR. although that has its own drawbacks.
Note that you may be unable to run this spec if you are on a realm with a debuff limit, and no Dual Spec, e.g. on old Classic Era servers. Without Dual Spec you'll have to run this for the entire raid, and outside of Twins this spec focuses on keeping up Corruption. Your raid may not allow a debuff slot for Corruption. That said, it would still function the same on Twin Emps.
6.2 DS/Ruin
Next let's look at DS/Ruin.
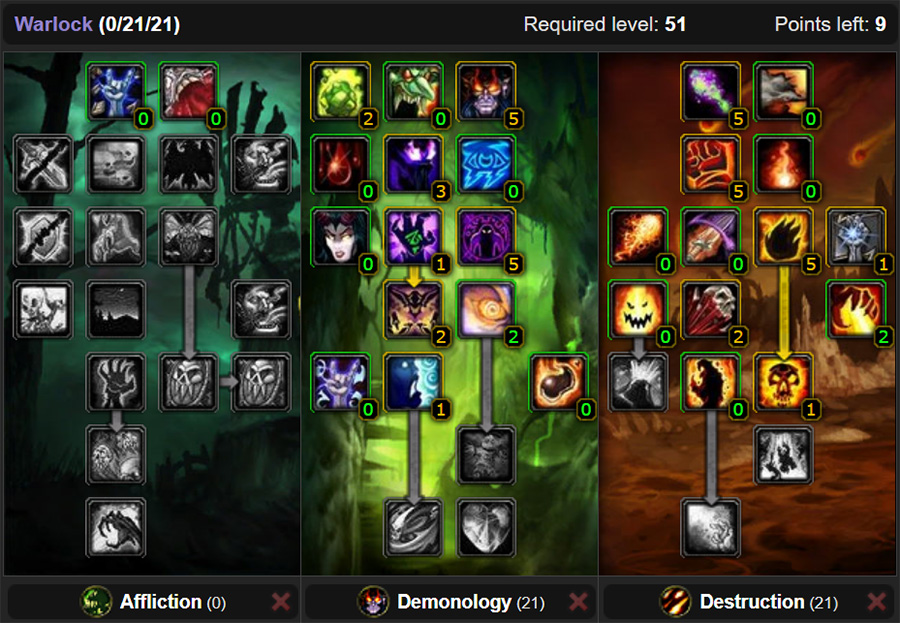
With this build we will not run a pet, instead we Demonic Sacrifice our Imp to increase our Searing Pain damage by 15%. Notice in Figure 20 that we still have 9 talent points unspent. We have two choices:
- Put them into Affliction to get Suppression, Improved Life Tap, and possibly Improved Corruption. This is the most common choice if this is your main DPS spec. For Twins this option will give extra Spell Hit for Curse of Doom.
- Go deeper into Destruction to get 5/5 Emberstorm, further increasing our Searing Pain damage by another 10%. For Twins specifically this is the better choice, but you may prefer the former option if you use this spec on other fights.
Advantages:
- The +15% Stamina from Demonic Embrace is a lot. Let's consider the example T2 + Crafted SR set shown in Example SR Sets. We lose ~500 HP without Blood Pact, but we gain ~850 HP from 5/5 Demonic Embrace. Remember this is assuming world buffs but no Blessing of Kings. That's a net ~350 HP gain compared to SM/Ruin.
- Higher Searing Pain damage. Demonic Sacrifice is quite a substantial gain to our Threat. although not increasing the consistency in terms of Spell Hit it will make holding Threat easier. Emberstorm even more so.
- Improved Healthstone. This one is very minor, but if we do need to use our Healthstone we'll heal for a little bit more.
Disadvantages:
- No Blood Pact for the Warrior tank. Realistically, we have a much easier time surviving in this fight than the Warrior tank. Vek'nilash can deal a huge amount of damage, especially if it is your Warrior tank's first time tanking this it can be tough. You MUST discuss these options with your raid leader. Will the Warrior have enough HP without the +42 Stam from Blood Pact? Don't make this decision alone then surprise your raid on the day, especially in Hardcore.
If you're playing with a debuff limit (not a factor in HC), then this is likely already your default Talent spec. If you're playing on a realm with Dual Spec then it can be a decent choice to swap to. Once again, it is important that your raid is aware that you will not be bringing Blood Pact for the fight. This build trades some party HP for a small personal HP gain and more Threat.
Note that if you have more than two Warlocks, a DPS Warlock could provide Blood Pact to mitigate this.
6.3 MD/Ruin
A classic spec for tanking Twin Emps is MD/Ruin. The Talents themself are similar DS/Ruin, except with the 9 spare points used to unlock Master Demonologist - which means we will keep our pet out instead of Demonic Sacrifice.
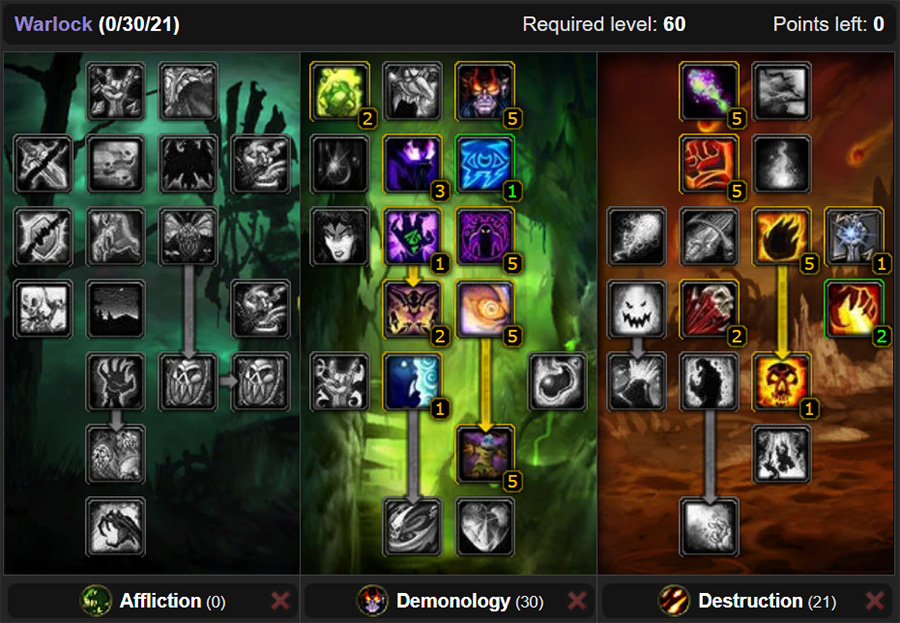
In Figure 21 we see the MD/Ruin Talents. The crux of this spec is Master Demonologist, with it we will gain +60 SR just by having our Felhunter alive.
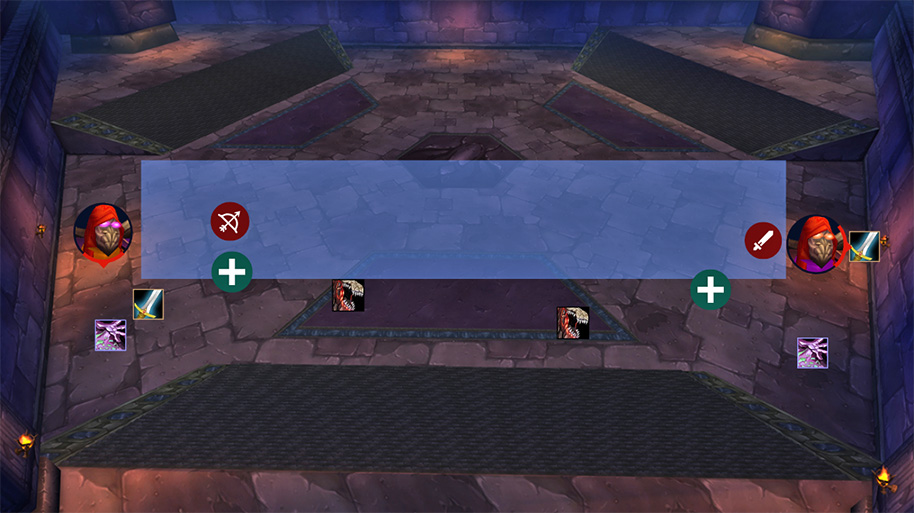
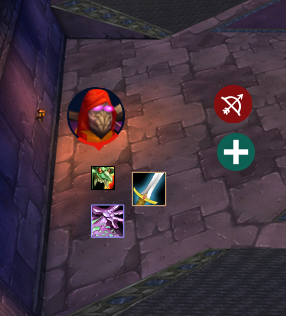
Figure 22 shows an example of how you can position your Felhunter. In this example the Left Warlock mid-Vek'lor tanking phase, and the Right Warlock is waiting while their side's Warrior tanks Vek'nilash. While the Felhunter just needs to be alive, and within 100 yds to not despawn, to recieve the buff you have some considerations:
- It should be away from players, such that it is unlikely to be take damage from Blizzard or Explode Bug. The path DPS will move through is approximately shown by the blue shaded region.
- It should be in range of the Healers on your side, just so they can heal it if it takes damage. If your Felhunter dies you will lose the +60 SR buff.
- You should avoid positioning Felhunter on the stairs, or out of line-of-sight of the boss positions. It is rare but it has been suggested that a complex path between Vek'lor and any unit can trigger Melee Mode.
You should position your Felhunter before the fight. It must be in both Stay and Passive modes. Be very careful of this. It's not uncommon to have Passive or Follow bound to a something easily misclicked, such as mouse wheel. If you accidentally make your Felhunter Follow you mid-tanking phase you will have no opportunity to reposition it until after Vek'lor Teleports away.
- If you make your Felhunter Follow by mistake, it is very likely to take Blizzard/Explode Bug damage and die.
- Even worse if you accidentally set it to Attack or Defensive. It will run to attack Vek'lor which can both mess with initial Threat after teleport as well as potentially trigger Melee Mode.
If your Felhunter dies, but Fel Domination is off CD, you can quickly resummon it using the following macro:
#showtooltip Summon Felhunter
/cast [mod:shift] Fel Domination
/cast Summon Felhunter
With this macro holding Shift will automatically use Fel Domination for a faster resummon. Not using Shift will summon the pet normally, i.e. for setting up before the fight.
Advantages:
- Master Demonologist gives +60 SR. If you're struggling with building your SR set, or were called up to tank last minute, this can be a huge help. It also gives the opportunity to focus more on Spell Hit and Stam, and can off-set the need to wear Engineer only Trinkets or the BoE SR Rings.
- Demonic Embrace gives +15% Stam. As discussed in DS/Ruin.
- Improved Healthstone.
- Plays like DS/Ruin for DPS fights. If you do not have Dual Spec, then for the other boss fights you can Demonic Sacrifice your Succubus and play the same way as DS/Ruin.
Disadvantages:
- Felhunter dying means -60 SR. This is a huge penalty. If your Felhunter dies you will suddenly start taking a lot more damage. It is crucial that you have over 210 SR without Felhunter, so that even if it dies you never take full damage Shadow Bolts. Make sure your healers are aware that they need to keep an eye on your pet's Health.
- No Blood Pact for the Warrior tank. As with DS/Ruin, it is important that your Warrior tank and raid leader know that there will be no Blood Pact in the party.
- No focus on Searing Pain improvements. This is relatively minor. It has the same Searing Pain output as SM/Ruin and I have never struggled to hold Threat with that build.
- No Suppression. I.e. you have no increase to Curse of Doom's Spell Hit to improve its consistency. Again, this is relatively minor.
Aside from the complications due to the Felhunter, this is a really good Talent build.
6.4 Soul Link
The next spec we'll consider is Soul Link.
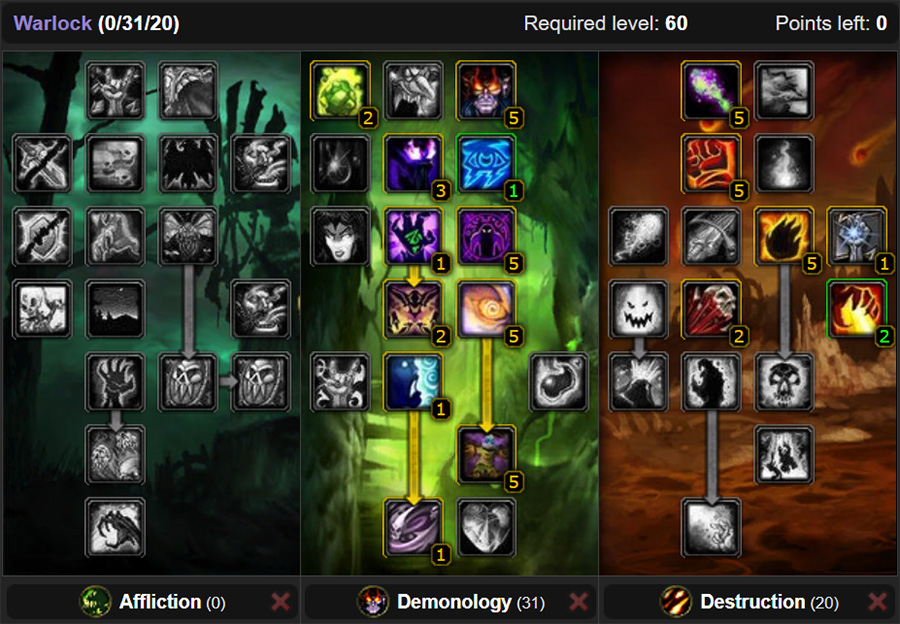
Figure 23 shows the Soul Link Talents. As you can see it is almost identical to MD/Ruin with one exception: Instead of taking Ruin we go one point deeper into Demonology for Soul Link. Without Ruin, your Searing Pain crits only deal 150% damage instead of 200% damage, however you gain a ton of extra mitigation. This is because 30% of all damage you take will instead be transferred to your Felhunter.
Let's return to the nightmare RNG, no protection potion or heals, combination we considered in the Stat Priority section. Previously we suggested that a maximum damage Shadow Bolt, Blizzard tick, Explode Bug combo would deal ~8170 damage. With Soul Link you instead would take just ~5720 damage, with your Felhunter also taking ~2450 damage.
This is a huge difference. However, your Felhunter will be taking constant damage through your tanking phase. This means that healers must focus on keeping it alive, splitting their heals 70/30 between you and the Felhunter.
Remember that Soul Link is not active by default. You will need to use the spell each time you summon your demon.
Advantages:
- Soul Link moves 30% of damage taken to your Felhunter. A huge level of mitigation, which can provide a big safety net in unlucky scenarios where you are hit with many mechanics in rapid succession.
- Master Demonologist gives +60 SR..
- Demonic Embrace gives +15% Stam..
- Improved Healthstone.
Disadvantages:
- Felhunter dying means -60 SR AND losing Soul Link. This could be devastating, considering you could suddenly be taking 40-50% more damage. If your healers are not prepared this is a wild swing in incoming damage that can cause major issues.
- Two targets to heal. Generally a good healer team with pet bars shown will not have trouble keeping the Felhunter alive. However, if you take multiple mechanics the healers should focus on keeping you alive, which may mean neglecting the also increased damage on your pet causing it to die.
- No Blood Pact for the Warrior tank. It is important that your Warrior tank and raid leader know that there will be no Blood Pact in the party.
- The lowest Threat spec here. Without Ruin this is by far the lowest Threat spec here. When overcoming the Warrior's initial Threat a crit can compensate for a resist, however this is much less of a factor without Ruin. Searing Pain Threat is still great, and so long as DPS are watching their Threat meters it should be fine once Threat is established. That reduced consistency after Teleport though can be quite noticable.
While the extreme mitigation that Soul Link offers is enticing, I return to the core principles of this guide: Simplicity and consistency. When it works, it can be a huge help, however there are a lot more things to focus on with this spec which can make performing the fight more complex for both yourself and the healers. One thing I love about our strategy, combined with SM/Ruin, is that it is extremely simple - for the most part you just stand there spamming Searing Pain while being bombed with heals.
6.5 Imp Imp
Finally, a Talent spec of my own machinations. What if we took SM/Ruin but removed all the points that are irrelevant to Twins and put them into things that are? Et voilà, we have Imp Imp/Emberstorm.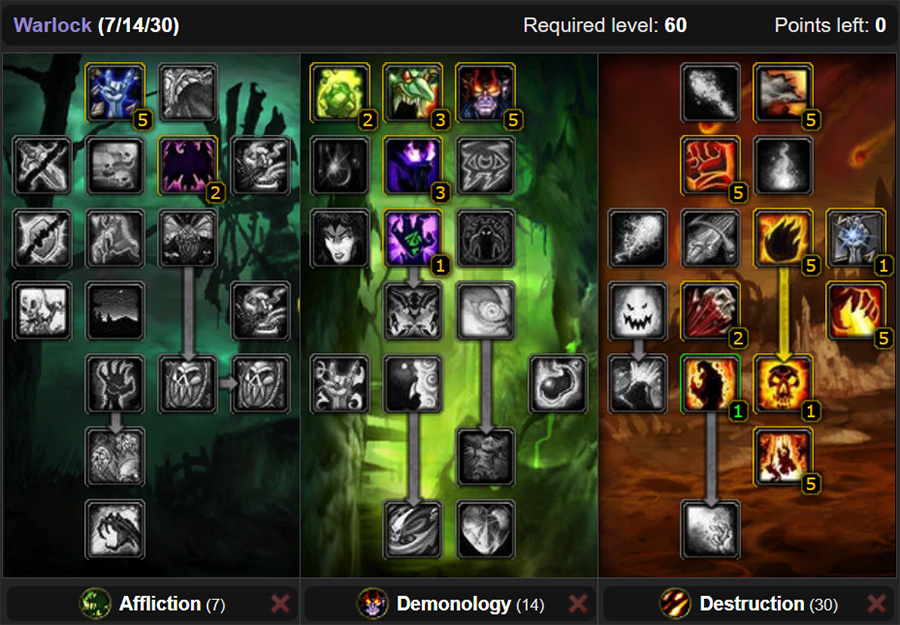
Figure 24 shows the Imp Imp/Emberstorm build. With this spec we run Imp for Blood Pact, however that Blood Pact is now +54 Stam due to 3/3 Improved Imp. We combine this with Demonic Embrace for even more Stamina. We still have Suppresion to increase the Curse of Doom consistency, but additionally we have 5/5 Improved Searing Pain and 5/5 Emberstorm to buff our Searing Pain Threat.
A very small trick, prior to The Pull, that this spec enables for the Left Warlock is: Summon Voidwalker, Sacrifice him, Fel Domination, then Summon Imp. While this does provide an extra absorb shield, on top of Shadow Ward, it is extremely minor. Remember we have plenty of mitigation against Shadow Bolt so it is largely unnecessary. I would NOT recommend this trick in general, since it can overcomplicate the pull for a minor gain. Simple is safe. However, it is an option if you want to use it.
Advantages:
- The highest possible Stamina, with 3/3 Blood Pact and 5/5 Demonic Embrace. This provides both us, and the Warrior tank, with +54 Stam in addition to a +15% Stam increase for ourselves. Let's look back at the T2 + Crafted SR set shown in Example SR Sets. This puts us at over ~10100 Health! Compared to a case of no Blood Pact and no Demonic Embrace, this accounts for ~1600 HP (with world buffs, but no Kings).
- +10% Searing Pain damage from Emberstorm. While not quite as large a damage buff as Demonic Sacrifice, this is still a noticable increase.
- 5/5 Suppression. +10% Spell Hit for Curse of Doom, making it less likely to resist.
- Improved Healthstone.
Disadvantages:
- Highly tailored for Twin Emps. Outside of Twin Emps this isn't a good DPS build.
- No increase to SR. Does not provide Master Demonologist for the +60 SR bonus.
- Not quite the highest Threat spec. While Emberstorm is good it is not quite as high of a Searing Pain buff as is possible from DS/Ruin.
If I was using this spec just for Twins, it would easily be my number one choice. If you're respeccing specifically for this fight, or you want to use your Dual Spec just for Twins, it can be an excellent choice.
There is also a more widely applicable version of this spec, that goes deeper into Affliction but doesn't take Emberstorm, Imp Imp/Utility.
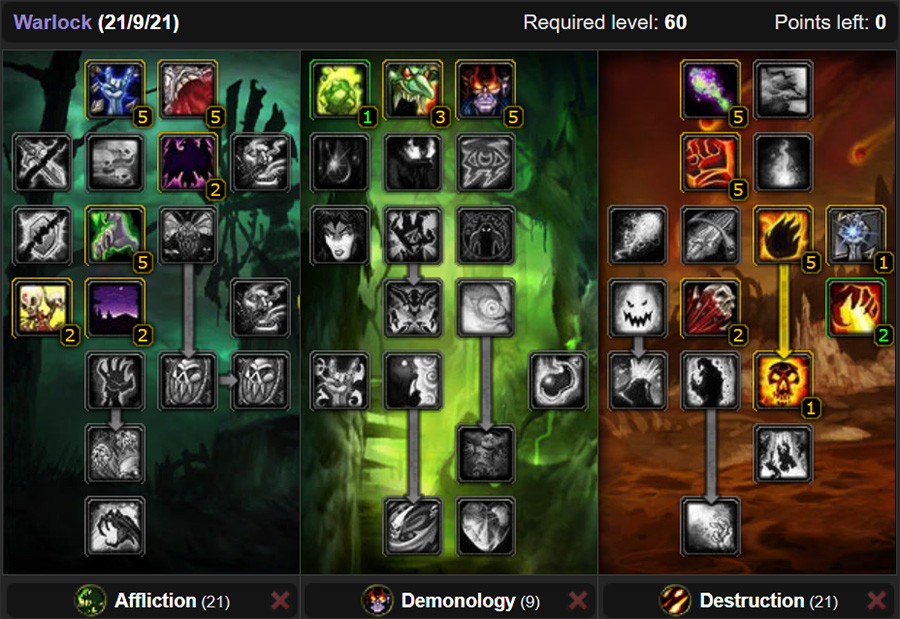
Figure 25 shows the Utility variant of the Imp Imp spec. This spec is one that I often recommend to beginner Hardcore 60 Warlocks who are less concerned with damage and want to just survive dungeon grinding and their first few raids. It plays just like SM/Ruin just taking Improved Imp and Demonic Embrace instead of Shadow Mastery. With 5/5 Fel Concentration it is also viable for open world mob grinding.
Aside from lacking the Searing Pain damage buff from Emberstorm, this has all the other advantages of the Imp Imp/Emberstorm variant. For Twins specifically it is still superior to SM/Ruin due to the much increased Stamina. If you want a more general Dual Spec, that can provide your party with Improved Imp on other fights too, then this can be a good choice.
A small thing to note: If you had 0/3 Improved Imp then swap to these talents you will need to click Blood Pact twice - disable then enable it. I have noticed this bug sometimes, where without toggling it the Imp is providing the unimproved version. Frustratingly the buff's tooltip always shows +42 Stam, but you can verify that it is working by looking at your Stamina in the Character pane.
7. Melee Mode
Melee Mode is a phenomenon where Vek'lor runs forward to melee the player, instead of standing still casting Shadow Bolt. Typically he will first run forwards Arcane Burst, which is actually the optimal outcome for us as the Warlock tank. These melee attacks can hit quite hard, if it crits you it can hit for ~6000 damage. You can see how this combined with a ~4000 damage Arcane Burst can potentially be lethal. Hence our decision to always have a GAPP up before the fight, despite this being a very rare mechanic. Following the strategy outlined in this guide I almost never see Melee Mode, but it does happen perhaps 1 in 20 fights.
7.1 Known Causes
Being too close to Vek'lor. The first, and most common, cause of Melee Mode is a player being too close to the boss. Usually this is the Warrior tank failing to immediately move far enough from Vek'lor immediately after the Teleport. This means being outside of not just melee range but also Arcane Burst range (10 yds). In fact, 10 yds is not always enough. The Warrior can run back to a similar distance as you as a guide. If a player is a little outside of Arcane Burst range then Vek'lor my walk forward and use the spell. A useful comparison are the caster mobs in WPL and EPL. They have a complex AI that will rarely move closer to Frost or Fire Nova you.
Credit to Pools on Defias Pillager for providing this footage.
Video 5 shows an example of this. As we see here it's not just about top Threat being too close. Anyone being too close can cause Melee Mode, including pets. This is why it is vital your pet is on Passive, and you don't accidentally send them in to attack. This is particularly important for Felhunter builds, since the Felhunter will run into melee if it is on Defensive.
If you have any further knowledge on Melee Mode, or some good clips of it happening, please reach out to me so I can expand this section!
Outranging Shadow Bolt. Vek'lor's Shadow Bolt has a range of 45 yds. If you outrange it he will of course chase you, however he won't necessarily stop and begin casting once in range. Often he will enter Melee Mode instead. Our strategy involves never repositioning Vek'lor - all repositioning is done by the Warrior tanking Vek'nilash. This means as the Warlock tank you should never be the cause of this, we avoid mechanics in a circular arc that keeps our distance to Vek'lor roughly constant.
What you cannot personally control are DPS who keep attacking Vek'lor right up until Teleport, or leave big hitting DoTs like Ignite rolling. A spell in mid-flight, or one that batches with Teleport, will hit Vek'lor after he reappears. This can cause someone on the opposite side of the room to be top Threat after Teleport, thus causing him to chase them. This is why it is vital that all DoTs expire before the Teleport window opens, and once the window is open everyone (including the Warlock tank) stops attacking him.
The only time I would ever reconsider repositioning Vek'lor as the Warlock tank is if he was within the Heal Brother range of Vek'nilash. This is extremely unlikely however as he would need to have moved very far out of position to be within 60 yds of the other boss.
Vanish, Feign Death, or Petri, during Teleport. A quirk of many Vanilla WoW encounters is the use of a hidden NPC to trigger mechanics for the fight. Sometimes referred to as the "Third Twin", there is an invisible unit under the map, Vek Twins Trigger, which handles the Threat mechanic for Teleport. It is advised that no one uses Vanish, Feign Death, or Flask of Petrification, during the Teleport window since if it overlaps the Teleport it can cause issues. I have never actually seen this myself, however I am told on good authority that it can happen. For safety I recommend against the use of these abilities, and certainly not inside the Teleport window.
What I have experienced numerous times on non-Hardcore is a player being dead during the Teleport, then revived through Rebirth, Ankh, or Soulstone. If you're dead during the Teleport your Threat may not be reset, meaning when revived you are likely to have a lot of Threat on the boss. When I was first learning Twin Emps, back in 2020, I successfully used this to recover a pull - I had died fighting Vek'lor but waited until the next time he was on my side to use my Soulstone.
Evading the boss. While this has never been confirmed, it is widely reported that people have had far fewer instances of Melee Mode by avoiding having anyone (certaintly the tanks) standing on the stairs by the room's entrance. This makes some intuitive sense: If the boss cannot path to you he may behave strangely. While I have never seen definitive proof that the stairs cause Melee Mode, I do know that they can cause line-of-sight issues between a until downstairs one one on the upper level by the wall. I personally use this to avoid the Fear effect when the post-Twins Qiraji Mindslayers die. Nonetheless, our strategy doesn't actually have anyone on the stairs, so this is not an issue.
7.2 Recovery
To exit Melee Mode you are going to need to try to be an appropriate distance from Vek'lor that allows you to tank the boss. You may have to run away to avoid being hit in melee multiple times. You should NEVER Petri while tanking Vek'lor. This will wipe your Threat, and it's unlikely that you will be able to recover during this tanking phase. The only exception would be if your raid leader calls for everyone to Petri.
The first thing to consider is where the Arcane Burst is going to send you. You should be aware of this so you are not trapped in a corner.
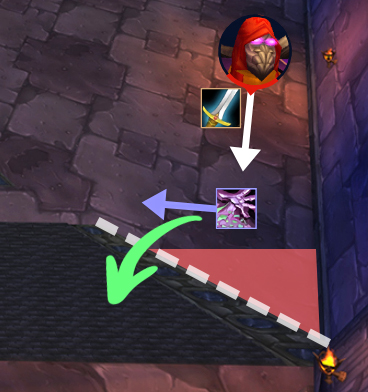
In Figure 26 we see a case where the Warrior tank has triggered Melee Mode by being too close to Vek'lor. As soon as you notice that the boss is in Melee Mode (moving) you should focus on where an Arcane Burst will knock you:
- The white arrow shows the direction Vek'lor is moving.
- The dotted line marks the edge of the ramp.
- The shaded red region is where you do NOT want to be sent. You can get trapped in this corner between the wall and the ramp.
- The green arrow shows an optimal Arcane Burst knockback, sending us up onto the ramp, and importantly not into the red region.
- The purple arrow is how I would move if I noticed Melee Mode. I am moving laterally so that I am knocked onto the ramp instead of into the corner.
The main focus here is to not be knocked into the corner between the wall and the ramp. This is a bad place to be:
- The edge of the ramp may break line-of-sight from your healers.
- You will have to move all the way through Vek'lor to leave melee range.
In my opinion being knocked up onto the stairs is a decent option, since your healers have clear line-of-sight to you. You are also not bringing Vek'lor into melee range with the DPS group.
Credit to Seanlock on Defias Pillager for providing this footage.
At roughly the 11 second timestamp in Video 6 we see an example of Arcane Burst knocking the Warlock tank up onto the ramp. This was a particularly challenging example of Melee Mode, where the boss melees the Warlock prior to the Arcane Burst.
Often, Arcane Burst will send you to a distance that is reasonable to tank the boss at. In many cases the Melee Mode will end here, and you can simply remain in your new position and continue tanking the boss.
DPS stop, and leave melee range. Having to overcome DPS that are still pumping, or are within melee range, is too much to ask of a Warlock tank trying to get Vek'lor to exit Melee Mode. However, if a DPS is close on Threat and the correct distance to tank Vek'lor they could purposefully overtake Threat in an attempt to temporarily take over as the tank. Generally, I do NOT recommend this. The intention must be clearly communicated to the raid, and you must be tanky enough to survive. The primary issue here is that so much is already going on, and people are likely panicking. Adding another person into this can make communication difficult, and its also adding in another person to heal. Ideally the healers are focused on bombing all possible heals into the Warlock tank during these crucial moments.
LIP then cancel it. An option that has worked well in the past to force Vek'lor back into casting Shadow Bolt is to Limited Invulnerability Potion, and then cancel it almost immediately afterwards. You can remove LIP by right-clicking the buff off, or by using:
/cancelaura InvulnerabilityThis works because usually Vek'lor will target the 2nd Threat player when you LIP. Assuming they are at the correct distance, Vek'lor will likely exit Melee Mode and decide to Shadow Bolt them. You must cancel this quickly. Worst case scenario the DPS player takes 1 Shadow Bolt, you must not let them take multiple. Be ready to cancel before you use the LIP.
Notice I say "usually". The interaction of LIP is somewhat inconsistent with Vek'lor, and I believe the outcome may depend on what he is doing at the instance that you use it:
- He targets a new player and starts casting Shadow Bolt at them. This is the most common outcome that I have seen.
- He exits Melee Mode but continues to cast Shadow Bolt at you. This was an unexpected result but I have had it personally happen on two occasions.
- He continues to Melee you despite you having LIP up. We see this happen in Video 6.
I consider LIP a last resort. You can first see if Arcane Burst allows you to land in a new tanking position that causes Vek'lor to exit Melee Mode first.
Greater Stoneshield and tank some hits. I did not include Greater Stoneshield Potion in the Consumable List since I generally thing LIP into immediately cancelling it is a better option. However, you could choose to Stoneshield in order to stay top Threat on Vek'lor. This is the potion equivalent of putting on a Shield, and it is a decent amount of mitigation. That said, Vek'lor hits very hard so even with Stoneshield it's going to be hard to heal you through it. Thankfully Vek'lor has a reasonable swing timer, I believe it is ~1.9s, so if healers are bombing you with heals you should be able to tank a couple of hits.
Ensure the Warrior tank is closest to Vek'lor before Teleport. It is very likely that your new tanking position is much closer to Vek'lor when he exits Melee Mode than you are used to. It is vitally important that the Warrior is closer once the Teleport window opens. You may have to adjust to move back slightly to allow the Warrior to get closer, however I would advise not moving too much once you have him in a position that is working. Remember, the boss will do nothing for 1-2s after Teleport. Use this time to get away.
In Video 6 we see that the Warlock tank is closer than the Warrior when Teleport occurs. Vek'nilash targets the Warlock hits them three times, each for ~2000-3000 damage (non-crit). If this happens you should immediately LIP. If LIP is on CD from the previous phase you should Petri, with the video showing a great example of this. If Vek'nilash uses Unbalancing Strike on you then there is a good chance you will be one-shot.
8. Spell Pushback Analysis
A common question is: Should we use Concentration Aura, or the PVP gloves, to mitigate spell pushback? The answer may surprise you, I recommend running 0% spell pushback mitigation! Before we discuss that, let's briefly explain what spell pushback is.
The first time you are hit while casting a spell, your cast time will be reset by some amount:
- If you are over 1s into a cast, then your cast bar will be "pushed back" by 1s. For example, if you are hit 1.3s into casting Searing Pain you will be reset back to 0.3s into the cast.
- If you are under 1s into a cast, then your cast bar will be reset to zero. For example, if you are hit 0.1s into casting Searing Pain you will be reset back to the beginning of the cast.
The second hit will instead push you back by just 0.8s, the third by 0.6s, the next by 0.4s, the next by 0.2s. However, since Vek'lor's Shadow Bolt cast time is 1.6s, which is higher than our Searing Pain cast time of 1.5s, we only need to consider the case where we are hit once during the cast (1s pushback).
We have the following ways to gain a chance to resist the spell pushback effect:
- Concentration Aura: Untalented this gives a 35% chance for party members to ignore spell pushback.
- Improved Concentration Aura: At 3/3 Talent points this increases the pushback resistance chance to 50%.
- Warlock PVP Gloves: 50% chance for Searing Pain to ignore pushback resistance. Available at PVP Rank 7, with a higher quality version (with the same effect) unlocked at Rank 12.
8.1 Results
The results here are perhaps unintuitive until you think about it:
- The best setup is both Improved Concentration Aura AND PVP gloves. This gives a 100% chance to ignore spell pushback.
- The second best is to use neither! That is, do NOT use any form of Concentration Aura and do NOT use the PVP gloves.* Having 0% pushback resistance is better than having a partial chance.
- The worst setup is any combination that does not reach 100% pushback resistance.
With zero pushback resistance your cast time syncs with Vek'lors, meaning that after the first few casts your effective Searing Pain cast time becomes 1.6s. That is just a 0.1s increase, or ~6.7%, which is very minor.
For Horde the choice is simple, you don't have Paladins, so do NOT wear the PVP gloves. This is also true for Alliance on Hardcore servers where the PVP gloves are unavailable.
For Alliance on non-Hardcore servers you can choose to wear the PVP gloves, so long as your party's Paladin has 3/3 Improved Concentration Aura. This can be a good choice for improving the consistency with which you overtake the Warrior tank's initial Threat. However, do note that it requires you to wear the PVP gloves instead of something like T0.5 Gloves.
This means that our Paladin can keep up Devotion Aura to provide extra mitigation for us during Melee Mode, as well as for the Warrior tanking Vek'nilash.
*There is a case to be made for the 85% pushback resistance from untalented Concentration Aura and PVP gloves, with a lower average cast time than 1.6s. However, given how minor the benefit is I would not use this combination, especially since it is still capable of suffering from bad RNG.
8.2 Explanation
First we'll discuss the theory behind why this is.

Figure 27 shows spell pushback suffered by successive Searing Pain casts assuming Vek'lor's Shadow Bolt first hits us 1.3s into our cast. The red crosses indicate cast bars that will be pushed back, the green checkmarks indicate bars that will complete their cast. A green bar indicates the current cast progress, and a faint red bar the cast time lost due to the last pushback.
If Shadow Bolt hits us at over 1s into our cast (e.g. Cast 1), on the next cast we will be hit again but at under 1s (e.g. Cast 2). Once we have suffered pushback less than 1s into our cast, all successive casts will now always recieve pushback 0.1s in (e.g. Casts 3 and 4). At that point, assuming we do not stop spamming Searing Pain, we will suffer exactly 0.1s of pushback on each cast; i.e. our effective cast time will be 1.6s (the same as Vek'lor's). Depending on the timing of when the first Shadow Bolt lands, we will suffer a larger pushback on our first 1-2 casts, but all casts after that will take 1.6s.
To explore this further I wrote a simple MATLAB simulation of the fight. First we'll test our hypothesis, by considering the case with zero pushback resistance.
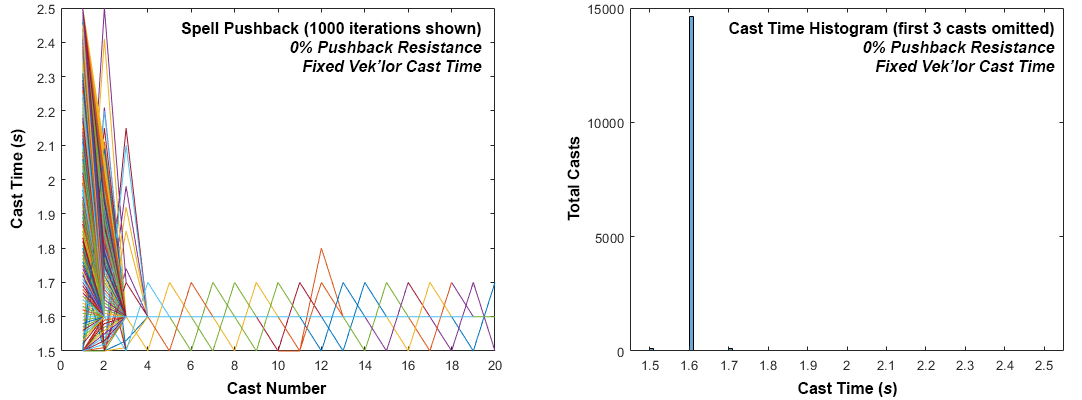
In Figure 28 we see the results of 1000 iterations of the simulation. The timing for the initial Shadow Bolt hitting us is randomly chosen each interation. We see that by ~3 casts we are synced with the boss's 1.6s cast time. The small variations are due to the the 1% base chance to resist a Shadow Bolt that we always have.
However, Vek'lor occasionally pauses, taking very slightly more than 1.6s to cast. This will cause higher and more inconsistent pushback. We should model this. To model the variation in Shadow Bolt timing I used a half normal distribution and with a standard deviation of 0.02s and a maximum cast delay of 0.1s.
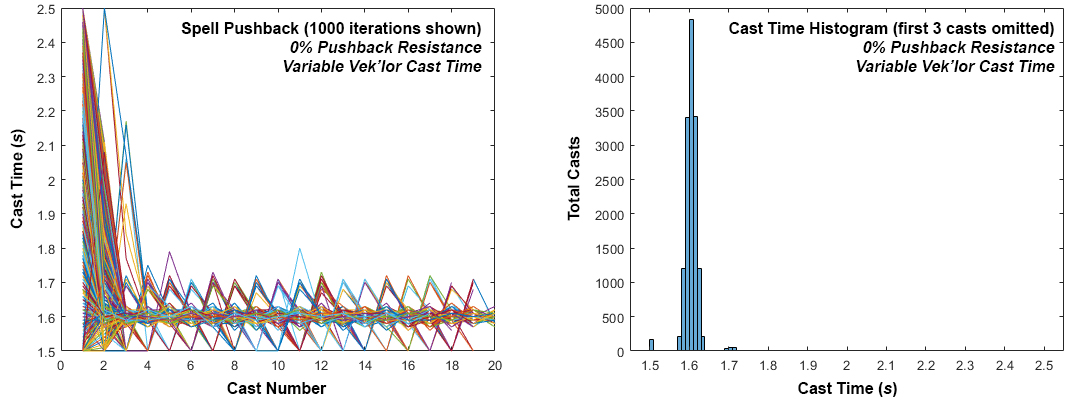
Figure 29 shows the results after introducing this variable Shadow Bolt timing, for 1000 iterations. Looking just at casts after the first 3, i.e. after syncing, we had:
- Mean Cast Time: 1.6002s
- Standard Deviation: 0.0188s
- Minimum Cast Time: 1.5s
- Maximum Cast Time: 1.8s
- Median Absolute Deviation: 0.0111s, this will be a useful comparison later when we see that other pushback resistances give multimodal distributions.
- Average Cast Time for 3 Consecutive Casts: 1.6000s
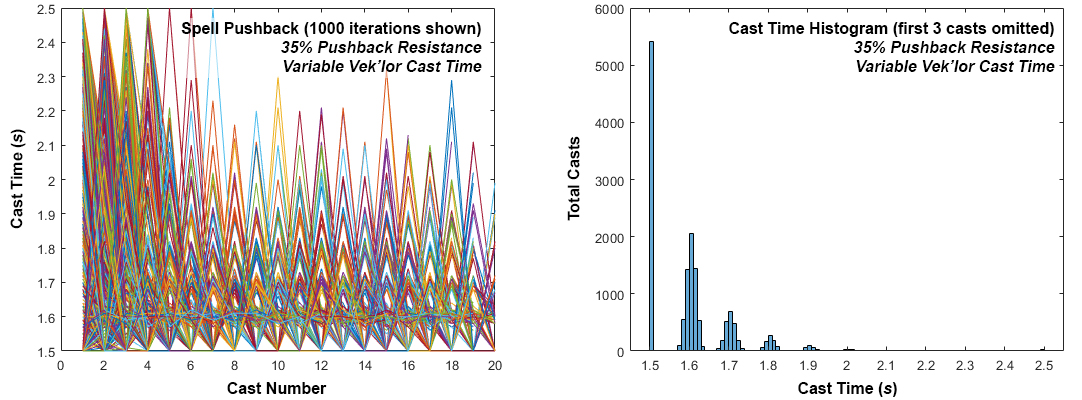
Let's instead now consider the case of using just the standard Concentration Aura, i.e. a 35% chance of pushback resistance. The results are shown in Figure 30, and we see there are huge inconsistencies in cast times. The result is a multimodal distribution, representing the number of times we resisted a Shadow Bolt before finally taking pushback. Of course, ~35% of casts are 1.5s. However, the pushback resistance means we do not sync up with the boss's cast and so can suffer pushback much later in the cast. This results in much longer effective cast times.
- Mean Cast Time: 1.6047s
- Standard Deviation: 0.1098s
- Minimum Cast Time: 1.5s
- Maximum Cast Time: 2.5s
- Median Absolute Deviation: 0.0777s
- Average Cast Time for 3 Consecutive Casts: 1.6009s
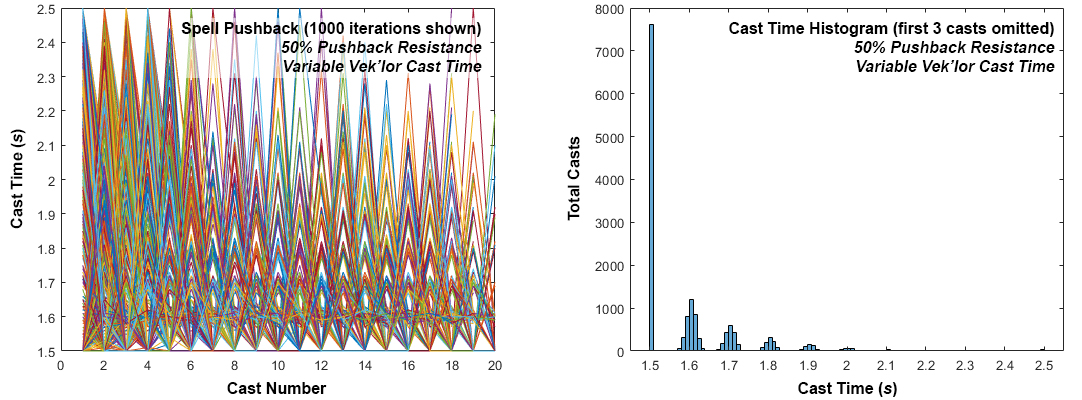
Next we'll look at 50% pushback resistance. This is equivalent to just running PVP gloves and no Paladin Aura, or just running 3/3 Improved Concentration Aura without the gloves. The results are shown in Figure 31. We see the same effect here as for 35%. Yes ~50% of the casts are 1.5s, however the times that we do not ignore pushback have hugely inconsistent cast times.
- Mean Cast Time: 1.6053s
- Standard Deviation: 0.1458s
- Minimum Cast Time: 1.5s
- Maximum Cast Time: 2.5s
- Median Absolute Deviation: 0.1070s
- Average Cast Time for 3 Consecutive Casts: 1.6013s
An important note here is that for 35% pushback, ~16.9% of casts were longer than 1.7s. For 50% pushback, ~19.7% were longer than 1.7s. This makes sense when we remember that if a cast suffers pushback over 1s into the cast, then on the next cast we will be hit much earlier (at under 1s) into the cast. If we ignore pushback when it would have otherwise only recieved a small penalty it results in a much larger penalty next time. We are next hit when we are late in the cast again.
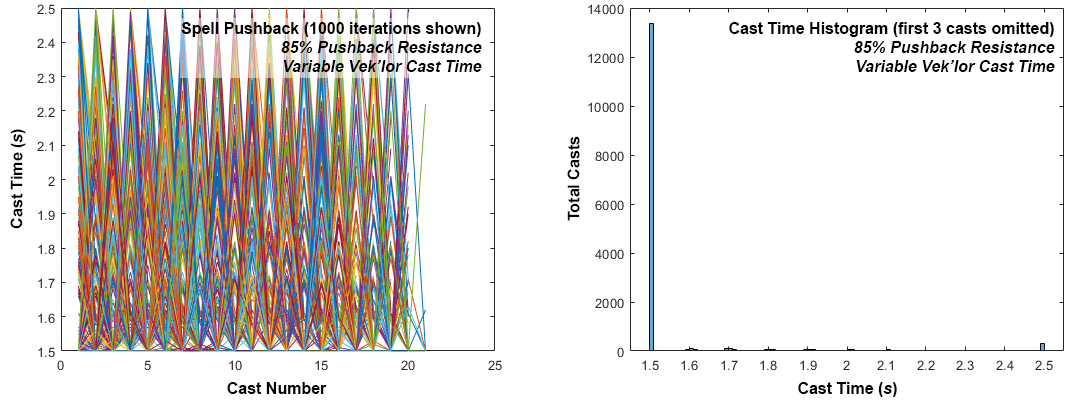
Finally the 85% pushback resistance case, where we have untalented Concentration Aura combined with the PVP gloves. The results are shown in Figure 32. The left graph, showing all 1000 trials, is difficult to interpret. The key thing to notice is that as we increase the pushback resistance the density of lines that are in the 1.6s cast time range gets less and less. The syncing effect was still observable in some trials previously, whereas at this point it is almost entirely gone. As seen in the histogram, we still have an inconsistency in our casts, but as expected only ~15% of casts are greater than 1.5s.
- Mean Cast Time: 1.5701s
- Standard Deviation: 0.2006s
- Minimum Cast Time: 1.5s
- Maximum Cast Time: 2.5s
- Median Absolute Deviation: 0.1195s
- Average Cast Time for 3 Consecutive Casts: 1.5700s
This is the first time that we actually have an average cast time that is below 1.6s. The deviation shows that the unresisted pushback is still resulting in wildly inconsistent cast times, however it is such a minority of the Searing Pain casts that it is less relevant. That said, with this setup it is still possible to get very bad RNG and have a string of casts with a high average cast time.
The 100% pushback resistance case is trivial, 100% of your Searing Pain casts are 1.5s. Personally I feel that the benefit from any of these partial, or full, pushback mitigation setups is so minor as to not be worthwhile. I feel that the 35% and 50% cases are clearly worse than 0%, and the benefit from 85% and 100% is very small. Realistically the benefit is not going to change whether you successfully defeat Twin Emps. Having Devotion Aura up is far more impactful, since the Warrior's tanking phase and the rare Melee Mode are the real difficult part of this fight.
9. Useful Resources
- Vek'lor Searing Pain Resist WeakAura
- Royalgiraffe's Resistance Calculator
- Royalgiraffe's Resistance Guide
- Zephan's Warlock Sim
- esuvii's Twitch Stream: Come ask me questions or give feedback!